Sampler Effects
Effects
Adding effects to samples greatly expands the possibilities of their sound beyond the original audio. The way this is achieved is by using various audio effects and other devices to construct an FX Chain, which can affect any number of samples simultaneously. FX Chains (.xrnt) can be loaded and saved as presets using the drop-down menu located at the top right corner.
By default, instruments that make use of FX Chains will only be played in a single track in Renoise, or a single output bus in Redux.
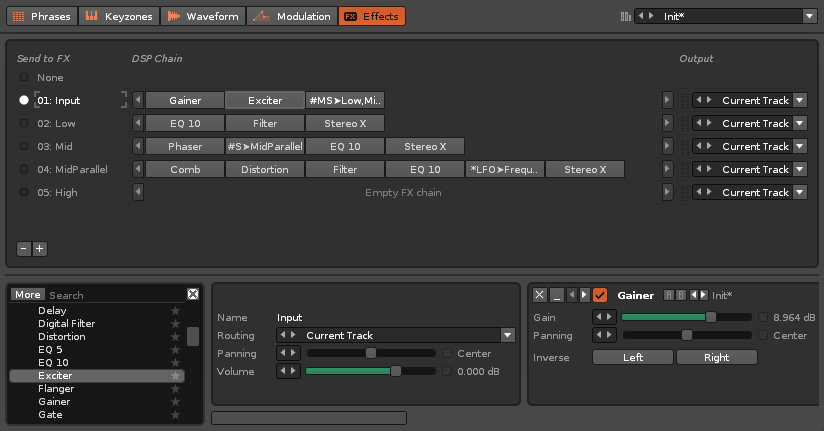
The interface is split into two sections. At the top is the FX Chain list, which also shows some of the devices and output routing. The lower section is where the selected FX Chain is constructed.
The FX Chain List
An FX Chain is a collection of effect devices. Any number of Chains can be created and each instrument has its own unique FX Chain list. The individual samples of an instrument can be assigned any one of its FX Chains, allowing different samples to be affected in different ways. An FX Chain can also be assigned to multiple samples simultaneously, so any changes made to a Chain will affect all linked samples.
The FX Chain assigned to the current sample is marked with a circle at the list's left. Clicking on an empty circle slot will assign that FX Chain to the sample. Clicking anywhere else on an FX Chain will select it for editing. Double-clicking on an FX Chain's name allows you to rename it.
FX chains can be added or removed using the buttons at the bottom left:
 - Delete the currently selected FX Chain.
 - Insert a new blank FX Chain below the currently selected Chain.
To the right of the FX Chain's name is a minimized view of that Chain's devices, which you can scroll through using the arrow buttons at either side. Further right is the output routing for the Chain, where you can route the audio to a specific track/bus.
Right-clicking on an FX Chain or device will select it and open a context menu with additional options:
- Cut: Cut the selected device.
- Copy: Copy the device.
- Paste: Paste the previously copied device after the selected device.
- Delete: Delete the device.
- Rename: Rename the device.
- Bypass/Activate: Enable/disable the device.
- Open External Editor: If the effect is a non-native plugin, this will open the plugin's editor.
- Device
- Copy Settings: Copy the property settings from the device.
- Paste Settings: Paste the previously copied settings into the selected device. Note that settings cannot be pasted between different types of devices.
- Init Settings: Reset the device settings to their default values.
- Device Chain
- Cut: Cut all of the Chain's devices.
- Copy: Copy all of the Chain's devices.
- Paste: Paste all of a previously copied Chain's devices (overwrites the selected Chain).
- Delete: Delete all of the Chain's devices.
- Load: Load an FX Chain (will overwrite the selected Chain).
- Save As: Save the currently selected Chain.
Creating FX Chains
The method of inserting and connecting devices to create Chains is identical for both sample FX and track effects, so for the sake of efficiency this is covered in one separate section: Effect Chains. Please refer to it for full details on this subject.
Output Routing
When you create an FX Chain within the Sampler, by default, that instrument will then be restricted to playing on a single track in Renoise, or a single output bus in Redux. However, at the right of each FX Chain is the Output routing option, which can be set to route the audio to a specific track or output bus, and this can be different for each FX Chain.
In Renoise, the default value is ‘Current Track’. When playing the instrument via the keyboard or MIDI controller, this refers to the track currently selected in the Pattern Editor. When playing back a song this refers to the track that the most recent note was triggered in. If notes are played in more than one track simultaneously, output will be routed to the right-most of those tracks.
You may find it useful to watch our video on this subject.
