Render Song to Audio File
Render Song to Audio File
Rendering your song to an audio file is usually the last step to take when you've finished creating your music, but it can also be use to export sections of a song, perhaps to be reused in another composition, or even for post-processing in other multi-track editors by rendering each track to a separate file. Renoise does not directly render .mp3 files, only uncompressed .wav files. However, those .wav files can then be easily converted to .mp3 with free external applications.
You can also quickly render, resample and reuse parts of the song from within the Pattern Editor.
Opening the Render Dialog
You can open the Render dialog by either clicking the "Render" button in the Disk Browser with the "Song" category selected, or by using the main menu option: "File -> Render Song To Disk...".
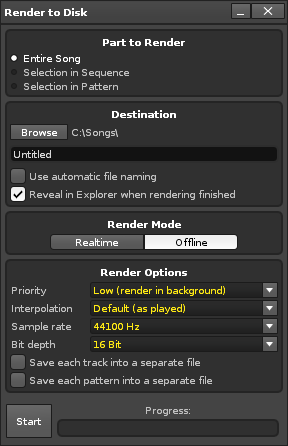
Part to Render
This specifies which part of the song you want to render. Note that muted tracks and columns are never rendered by Renoise, making it easy to exclude tracks/columns you don't want to export.
- Entire Song: Renders the entire song.
- Selection in Sequence: Render only a selected pattern range from the Pattern Sequencer. You can also select this range in the Pattern Sequencer directly by using the Pattern Sequencer's context menu: "Render Sequence Selection To Sample...".
- Selection in Pattern: Renders only the area selected in the current pattern (see Render & Resample Parts of the Song). This can also be quickly done using the Pattern Editor's context menu: "Render Selection To Sample...".
Destination
This determines where the .wav file will be saved and under which name. Hitting the "Browse" button will prompt you to select the folder where you would like the rendered files to be saved. Enter the name of the file in the text field under the "Browse" button. The destination file(s) will always be standard .wav audio files.
- Use automatic file naming: Will name the saved render(s) automatically. Clicking the drop-down menu that appears to the right will show the various commands which can be inserted into the naming scheme. Clicking on an option will place that text at the end of the existing command.
- Reveal in Explorer when rendering finished: Will automatically open the Destination folder upon completion of rendering.
Render Mode
Rendering Offline is faster, more accurate and allows more options. Rendering in real-time will simply play the song and record the output, which also allows the recording of Line-In Devices and MIDI instruments that play in real-time. Some plug-in instruments and effects may render incorrectly when running faster than real-time, so use this mode for those occasions.
Render Options
- Priority: Select the priority of the rendering process. "Low" will leave plenty of CPU power for other tasks, while "High" will use as much CPU power as possible.
- Interpolation: Choose the re-sampling quality that will be used in the rendering process. "Default" is what you've heard during composing and playback. "Precise" gives the best possible sample quality by running Cubic and Sinc interpolated samples in more precise, non-lookup table based HQ modes, which can remove a bit of interpolation noise (mostly inaudible below 96dB) without changing the character of the sound.
- Sample Rate: Select a sample rate for the rendering process. By default, the currently active sample rate is selected and it is recommended to use this. Many DSP effects may sound slightly different at other rates, so changing the rate could result in a slightly different sound from what you expect. Some external VST or AU plugins don't even support sample rate changes, so if you change the rate to something other than the default, make sure to listen back to the rendered result to ensure that everything is correct. Alternatively, play back your song in Renoise using the different rate first and fine-tune the song when needed. This can be done by changing the sample rate in the "Edit -> Preferences -> Audio" tab.
- Bit Depth - Choose the bit-depth of the rendered file. Renoise internally renders in 32-bit float, the highest quality, so you should use this format when you plan to reuse the rendered song in other applications. CDs use 16-bit with a sample rate of 44,100 kHz, so you can choose to render in this format for burning songs directly to CD (bear in mind the potential issues with changing your default sample rate as noted above, though).
- Save each track into a separate file: When enabled, the song will not be rendered into a single file, but instead will create one file per track. This can be useful if you want to export loops (when used in conjunction with "Selection in Sequence/Pattern") or to post-process the tracks in an external multi-track audio editor. Note that completely silent tracks will be deleted at the end of the rendering process.
- Save each pattern into a separate file: When enabled, this creates new files for every single position in the Pattern Sequencer (not just one copy of each numbered pattern). This is extremely useful to quickly cut and export your song as a set of loops.
Hidden Rendering Feature
- Sequence marker positions: When rendering your song, all of the Renoise sequence positions are written into the .wav file, giving you markers to easily cut up your work in external editors. The markers may also be useful to developers who can use them with their own internal play routines to trigger playback from any sequence position.
Quickly Rendering Parts Of A Song
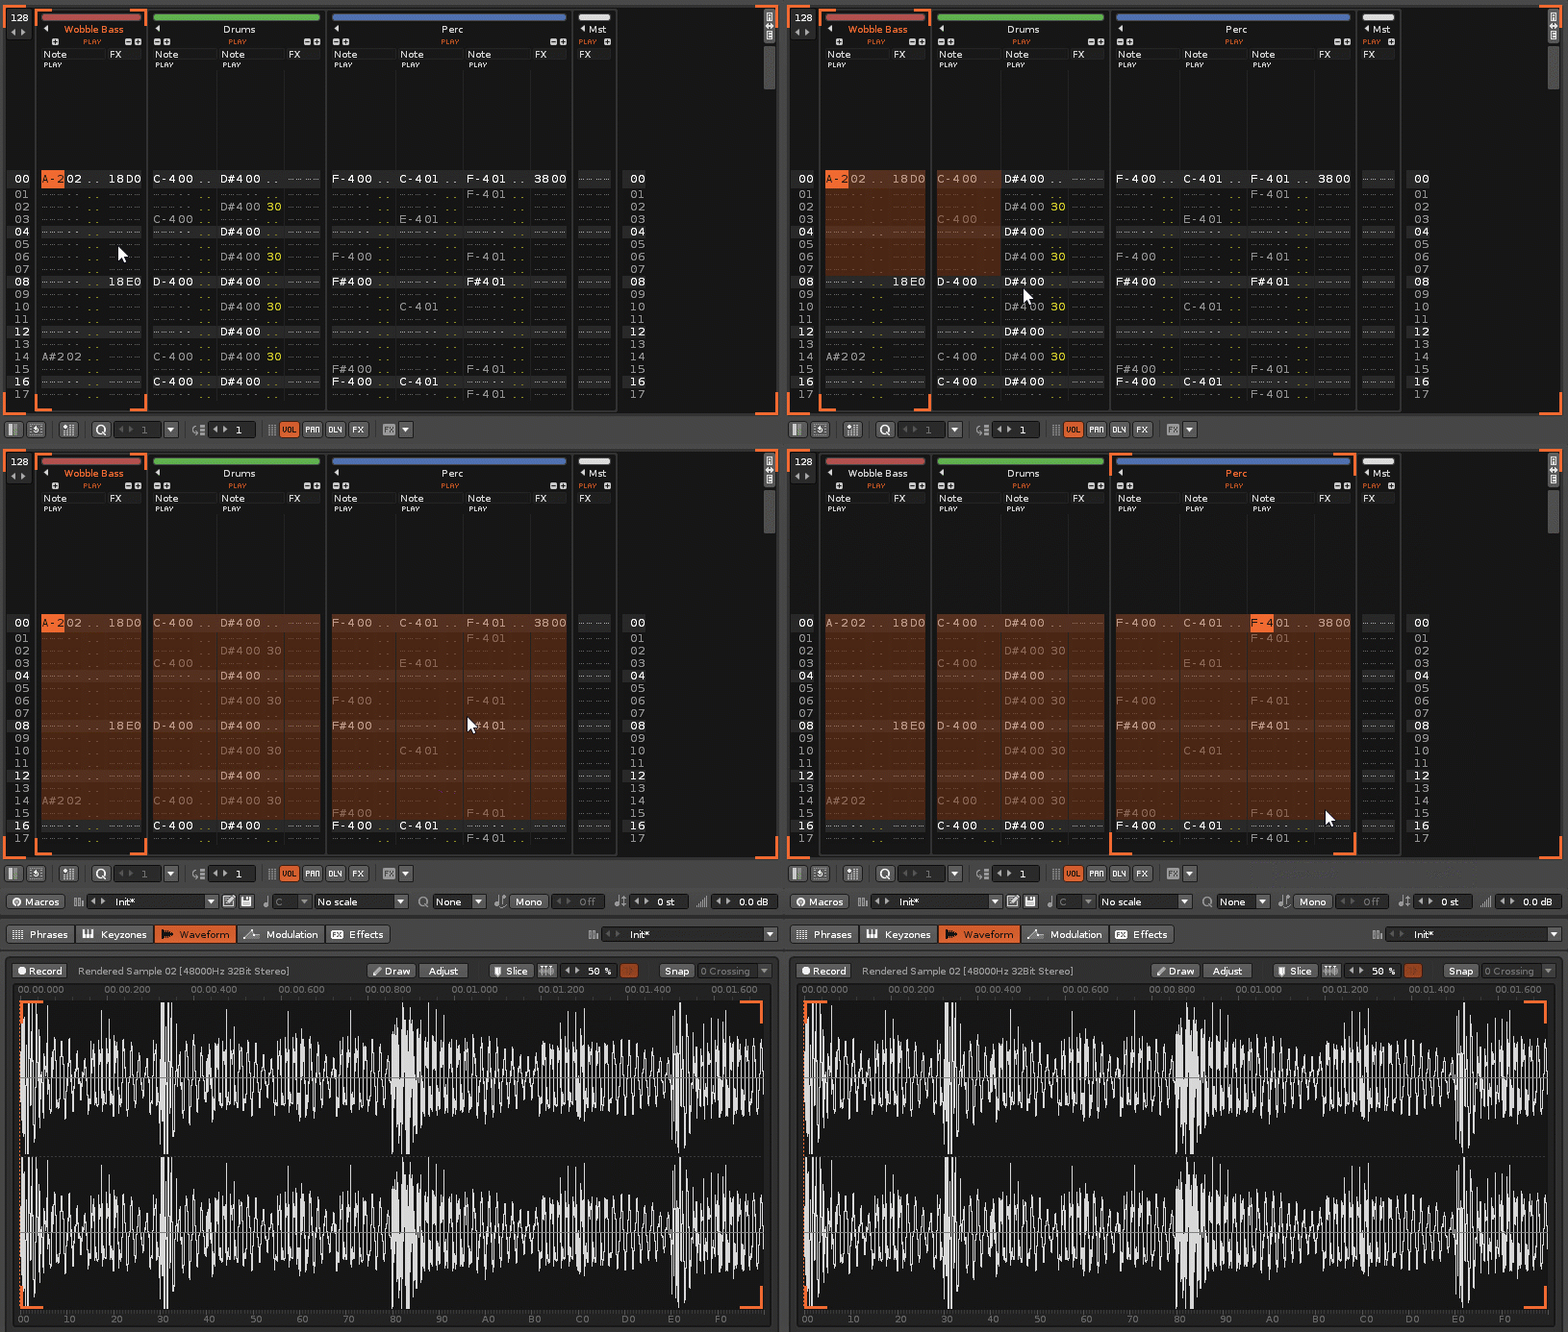
It's also possible to render only small parts of a song from within the Pattern Editor, perhaps for generating new samples or to grab sections which require a lot of CPU power when played normally. To do this, select one or more lines in the Pattern Editor, then right click (on the Pattern Editor) and select "Render To Sample" from the context menu. Alternatively, you can use the shortcut "Left Control/Command + Alt + Shift + R". The newly created sample will be loaded into the next free instrument slot.
If you want to create sample-based instruments from plugin instruments, you can use a dedicated function in Renoise to do so. See Render or Freeze Plugin Instruments to Samples for more information.

