Sampler
Sampler
Redux Note: Full Editor mode is the Redux equivalent of the Renoise Sampler.
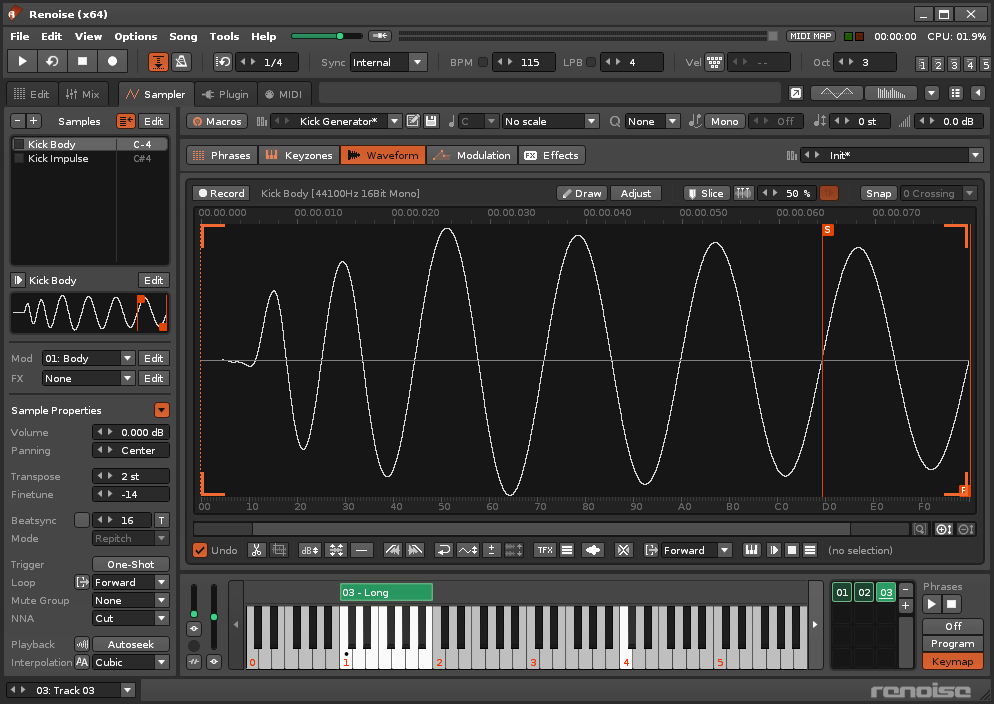
Renoise has a strong focus on samples (a singular focus in Redux, since it only uses samples) and at the heart of this is a powerful built-in Sampler for creating and sculpting sounds. An instrument may contain any number of samples and these are listed in the Sample List section at the left side of the interface.
New sounds can be recorded directly into the Sampler from external sources, or created by hand with the simple Draw tool. Existing samples can be imported and any changes made are exclusive to each individual song or instrument. The source samples are never modified unless you explicitly overwrite the file by saving it in the Disk Browser. Besides being non-destructive, the Sampler also supports endless undo/redo-ing of all your actions.
The Sampler is split into five different sections, each devoted to a different aspect of sample-based instrument construction:
- The Phrase Editor is a scaled-down version of the Renoise Pattern Editor where you can compose musical phrases that will be activated when specific notes are played.
- Keyzones allow different samples to be triggered over a variety of note and velocity ranges.
- The Waveform editor displays the samples so you can edit them with the provided tools and see the results graphically. It's also where new samples are recorded.
- Modulation devices form an interactive chain, constructing an envelope to shape a sample directly.
- Adding various Effects to samples greatly expands the possibilities of their sound beyond the original audio.
Specific preset types for each of these sections are available from a drop-down menu at the top right corner, where you can load, save, import and export.
Sample List
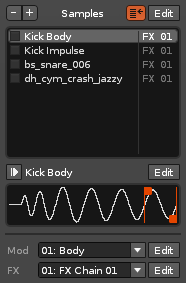
Located at the left, this section provides a list of the instrument's samples and is always accessible, no matter what central section you're working with, allowing you to switch between different samples whenever you wish. To select a sample, left-click on it in the list. This will also show the sample's name, waveform and assigned Modulation/FX sets at the bottom. When a sample is playing, the playback indicator to the left of its name will light up.
Selecting Multiple Samples
Left-click on a sample to select it. Now if you hold down "Left Shift" and left-click on another sample, both samples and any between them in the list will become selected. Holding "Left Ctrl" ("Command" on Mac) and left-clicking on samples will select/deselect them individually, allowing you to pick any combination from the list. When multiple samples are selected any changes made to the Sample Properties will affect them all.
Controls
 - Delete the selected sample from the list.
 - Insert a new blank sample into the list.
 - When enabled, a sample from the list will be automatically selected when it is played on the keyboard or by MIDI.
 - Open the Keyzones section. Note that the Keyzone range of each sample in the list is displayed to the right of it.
 - Preview the selected sample. Renoise only: The preview track is set in the Waveform editor.
 - Open the selected sample in the Waveform editor.
 - Assign a Modulation Set to the selected sample. Pressing Edit will open the Modulation section.
 - Assign an FX Chain to the selected sample. Pressing Edit will open the Effects section.
Note On/Off Layers
Samples can be triggered for either Note-On (key press) or Note-Off (key release) inputs. To move a sample to the Note-Off Keyzone layer, right-click on its name in the Sample List and select "Move to 'Note-Off Layer'". Use the same method to move samples back to the Note-On layer. When there are samples using the Note-Off layer, tabs will appear at the top of the Sample List allowing you to switch between the layers and view the samples contained within.
Sample Properties
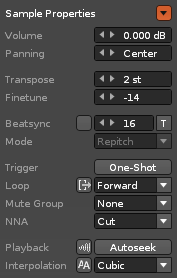
Directly under the Sample List, the properties of the currently selected sample(s) are displayed. The ![]() button at the top right toggles the opening and closing of this section.
button at the top right toggles the opening and closing of this section.
- Volume: The sample playback volume.
- Panning: The panning of the sample.
- Transpose: Transpose the note playback in semi-tonal increments.
- Finetune: Fine-tuning of the Transpose value.
- Beatsync: When enabled, the length of sample playback will be automatically changed so that it lasts for the selected amount of pattern lines, and this will auto-update to match any changes to the BPM or LPB. This is especially useful for syncing drumbeat loops. As an alternative, you can leave the checkbox disabled and instead press the
 button, which will set the Transpose and Finetune values to match the current tempo. Our video tutorial goes into more detail.
 - Mode: When Beatsync is enabled, you can choose how this affects the sample playback from the following three methods:
- Repitch: The sample is 'locked' at the pitch that matches the song’s tempo and you will be unable to use it at other pitches. This also disables the Transpose and Finetune parameters.
- Time-Stretch (Percussion): The sample can be played at any pitch via time-stretching, with a priority for preserving fast attacks, making it ideal for percussion.
- Time-Stretch (Texture): The sample can be played at any pitch via time-stretching, with a priority for preserving tonal accuracy, making it ideal for textures.
- Trigger: When One-Shot is enabled, Note-Off (key release) messages are ignored and the sample continues playing. This is incredibly useful for triggering samples from external hardware that is not traditionally 'held down' e.g. drum pads.
- Loop Finish: Toggles whether a sample will instantly stop or finish its current loop after a Note-Off input.
- Loop Type: When looping is enabled by selecting a loop type from the menu, start and end points are inserted into the Waveform, causing playback to loop between them. The loop points can be moved by click-dragging their tabs at the top/bottom of the waveform.
- Off: No loop.
- Forward: Loop playback from start to end.
- Reverse: Loop playback from end to start once the end point is reached.
- PingPong: Loop playback from start to end to start to end etc.
- Mute Group: Samples which are assigned to the same Mute Group will "Cut" each other off in the same track. A sample's Mute Group number is also displayed to the left of its name in the Sample List. Useful for drum kits built within a single instrument, since different samples of the same drum can realistically interrupt each other without interfering with the others. Our video tutorial goes into more detail.
- NNA: New Note Action. When a note is in the process of playing and a new note is played in the same column, NNA dictates how the previous note will behave. By default, samples will be set to "Note-Off", which stops the note and triggers any Note-Off actions. "Cut" will also stop the note's playback, but doesn't trigger Note-Off actions, instantly silencing it. To achieve polyphony you normally just use multiple note-columns, but by setting the NNA to "Continue", you can create the sustained playback of multiple notes using a single column. You may find it useful to watch our video covering both Note-Off and NNA.
- Playback
- Autofade: Automatically inserts a quick fade at the beginning and end of a sample. Useful for preventing unwanted audio clicks.
- Autoseek: During song playback, a sample is normally only heard once it has been triggered by reaching its position in the pattern. Enabling Autoseek allows the sample to be heard at any point during song playback without the need for triggering. Highly recommended for vocals, background ambience and other lengthy recorded audio.
- Interpolation
- Anti-aliasing: When enabled, interpolation is oversampled and band-limited. This helps to reduce aliasing noise, especially when using wavetable-like waveforms that are not multi-sampled. This increases CPU usage.
- Quality: The quality of re-sampling used when samples are played at pitches other than the original. "Cubic" is an excellent default interpolation, offering the best ratio of sound quality and CPU usage. "Sinc" is more precise but requires more CPU power, while "Linear" is the opposite and sounds rougher when played at lower pitches. Set to "None", samples will sound a bit more metallic and rough, which can be good if that's the kind of sound you're after and is also useful when creating wave-table generators with very short sample loops.
Macros
Macros allow for powerful handling and automation of an instrument's Modulation and Effects parameters. In Renoise this is controlled with the *Instr. Macros track effect, while Redux uses the options available within its host DAW.
You may find it useful to watch our video on this subject.
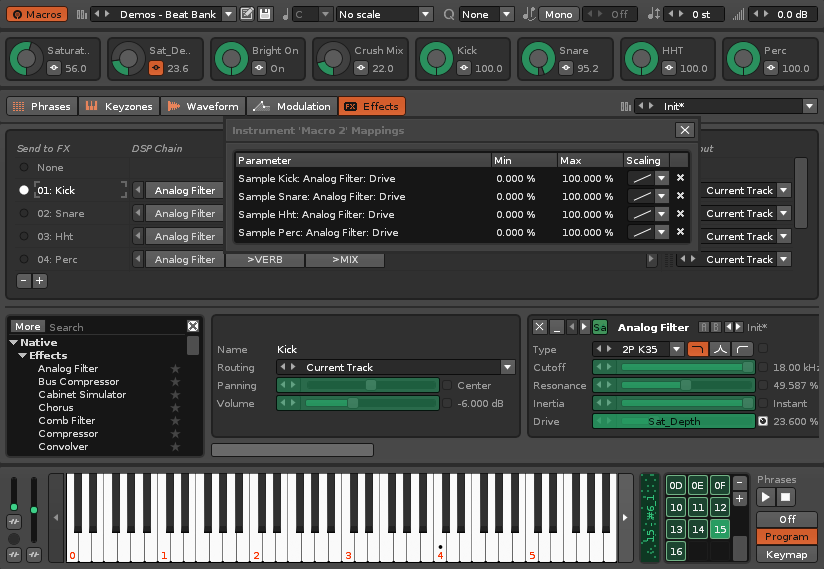
Pressing the ![]() button at the top left of the interface will open a panel with eight macros, each of which can be assigned to multiple parameters. To map a macro, press the
button at the top left of the interface will open a panel with eight macros, each of which can be assigned to multiple parameters. To map a macro, press the ![]() button next to it. This opens the mappings list and highlights any mappable parameters (shown here as green, but the highlighted colour may vary according to the current interface Theme). Clicking on a parameter will add it to the list and allow you to specify its Min/Max values and Scaling. Now altering the value of a macro will change the values of all assigned parameters.
button next to it. This opens the mappings list and highlights any mappable parameters (shown here as green, but the highlighted colour may vary according to the current interface Theme). Clicking on a parameter will add it to the list and allow you to specify its Min/Max values and Scaling. Now altering the value of a macro will change the values of all assigned parameters.
Clicking the X at the right of a mapping will delete it. Closing the mappings list removes the parameter highlighting and returns the interface to normal again. To rename a macro, just click on its name and type one in, finishing with Enter.
Found just to the left of the on-screen keyboard and representing pitch-bend, a mod-wheel and channel pressure, the MIDI controllers can also be mapped as macros.
Renoise only: Macros are also available in the Instrument Properties section under the Instrument Selector, giving you easy access to them while using the Pattern Editor or Mixer.


