Render or Freeze Plugin Instruments to Samples
Render/Freeze Plugin Instruments to Samples
The Plugin Grabber allows you to create sample-based instruments out of any plugin based instrument (VSTi/Audio Unit). You can also quickly render and replace (freeze) a plugin instrument this way.
Replacing a plugin with samples has advantages:
- When sharing your Renoise .xrns song file, your song can be opened and played back on any computer with Renoise, without the need for the plugin to be installed.
- Sample-based instruments always use less CPU power than plugins, because samples can be played back and pitched instead of being synthesized and generated on the fly.
- When not replacing, but creating new instruments with the grabber, you can quickly sample your favorite synthesizer sounds and create a small sample library for later processing and sound mangling. Samples in Renoise also can be manipulated in many ways that plugins cannot. For example, you can control the playback pitch, direction and offset at any time in the pattern with the Effect Commands.
Replacing a plugin with samples also has disadvantages:
- Automation of plugin synthesizer parameters with an *Instr. Automation Device will only work with the original plugin. The Automation can no longer be applied to the rendered samples.
- Samples are limited in length. Even though you can apply cross-fading to create smooth loops in Renoise with the grabber, such automatic loops may not always sound as detailed as the original.
You may find it useful to watch our video on the subject
Opening the Plugin Grabber Dialog
To directly sample and then replace a plugin instrument, you can use the Plugin Grabber in the Plugin section. Left-clicking the Render To Samples button will set the grabber to replace the plugin instrument (render the plugin and then unload it). Right-clicking will set the grabber to render the plugin into a new instrument slot.
Alternatively, you can right-click the plugin instrument in the Instrument Selector and then choose "Render Plugin To Instrument..." or "Render Plugin To New Instrument...".
Finally, you can also bring up the grabber by selecting "File -> Render Plugin To Instrument..." from the main menu.
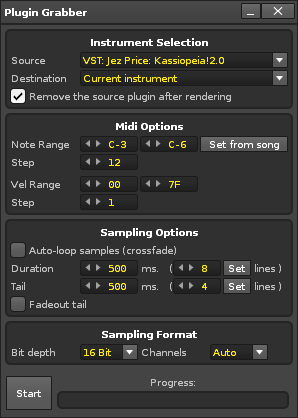
Instrument Selection
- Source: The plugin to be rendered. Only plugin instruments that can be grabbed will show in the list. Plugin instrument and effect aliases cannot be grabbed and so will not be listed.
- Destination: Where the resulting samples will be placed after rendering. "Current instrument" will overwrite the actual source instrument.
- Remove the source plugin after rendering: When enabled, the plugin will be unloaded after the rendering has finished. Unloading the plugin can be undone, just like any other operation, with "Left Control + Z".
Note: These options will be set up for you automatically when either clicking the record button in the Waveform section of the Sampler or launching the plugin grabber from the Instrument Selector. You still can change the settings after a rendering, so you can record a batch of instruments without opening and closing the dialog.
MIDI Options
- Note Range: The note range to be rendered. This and the "Step" option define how many samples will be created in the resulting instrument. When more than one sample is rendered, a multi-sample instrument will be created. "Set From Song" will parse your song and automatically fill in the range, using the lowest played note as the lower boundary and the highest played note as upper boundary.
- Step: How many samples will be rendered in the "Note Range". Setting this to 1 will individually render every single note. Setting this to 12 will render one sample per octave. The more samples are rendered, the closer the rendered result will be to the original.
- Velocity Range: The Note-On velocity that will be used to trigger the instrument when sampling it. Plugins may modulate some of their settings depending on the velocity.
- Step: How many samples will be rendered in the "Velocity Range". Setting this to 1 will render only a single sample for the entire velocity range. The more samples are rendered, the closer the rendered result will be to the original.
Sampling Options
- Auto-loop samples (cross-fade): When enabled, the sample is cross-faded and looped. Cross-fading creates a smooth, click-free loop and so is incredibly useful for pads or other long sounds. Enabling cross-fading will also disable the "Tail" (Note OFF) settings below.
- Duration: The duration in milliseconds of the Note-On phase, before a Note OFF is sent to the plugin. With cross-fading enabled, this will be the total length of the sample. Entering a number into the right value box and hitting "Set" will apply the correct length calculated from the line duration.
- Tail: How long the Note OFF phase will last. This is needed to sample the sustain phase of plugin instruments. Entering a number into the right value box and hitting "Set" will apply the correct length calculated from the line duration.
- Fadeout Tail: When enabled, the tail/sustain phases of the samples are cleanly faded out to zero.
Sampling Format
- Bit depth: The destination format of all rendered samples. 32-bit will create the highest quality files, but also the largest in terms of file size. 16 or 24 are good alternative bit depths, which still sound excellent and create smaller files.
- Channels: Allows the option of forcing the rendering to take place in stereo or mono.
