MIDI Mapping
MIDI Mapping
With MIDI Mapping you can remotely control Renoise from your external MIDI controller or master keyboard. Nearly everything you can do in Renoise with the mouse or the keyboard can also be done from an external MIDI controller.
MIDI mappings are saved along with your song, unlike the keyboard mappings in the Preferences, allowing you to create unique MIDI mapping sessions for every song and also share the settings by either using Template Songs or by importing/exporting common MIDI mappings in the MIDI dialog (see below).
Renoise will never automatically detect your MIDI controller and configure the mappings for you. You have to manually (at least once for a Template Song) set up the controller.
MIDI Device Setup
First make sure Renoise knows which device you want to use for MIDI mapping by setting it in the "Edit -> Preferences -> MIDI" panel.
Opening the MIDI Mapping Dialog
The MIDI Mapping dialog box can be opened with the "Options -> MIDI Mapping..." option in the main menu (or by pressing "Left Control/Command + M"). It can also be opened by clicking the ![]() button to the right of the VU meters at the top of the Renoise interface.
button to the right of the VU meters at the top of the Renoise interface.
Next to the "MIDI Map" button you will also find two small LEDs which show the MIDI input/output that Renoise receives/sends. If you are in doubt about whether your MIDI controller is set up and connected correctly to Renoise, then watch the green LED (input), which should blink when you use the controller.
- Left: MIDI Clock (if enabled in the MIDI Preferences)
- Right: General MIDI input and output
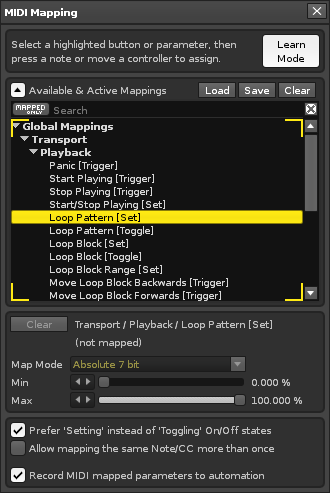
The MIDI Mapping Dialog at a Glance
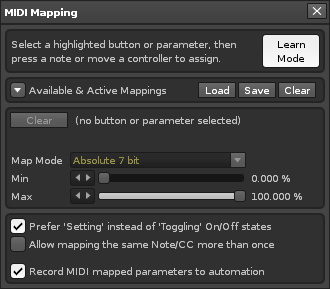
- Learn Mode:
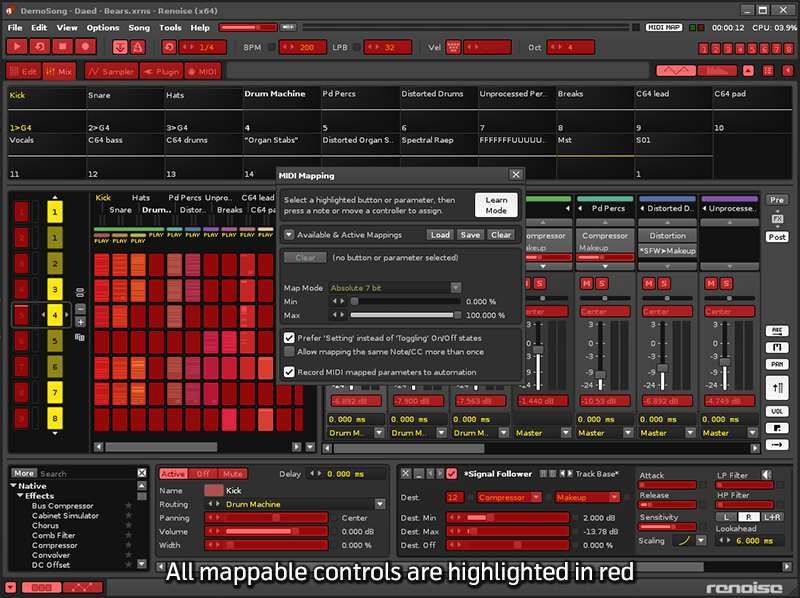
- Highlights all the parts of Renoise available for MIDI Mapping (see image below). Select a highlighted button or parameter, then press a key or move a controller to assign.
- When clicked, "Learn Mode" will become "Test Mode", which allows you to test out what you've just mapped without having to close the MIDI Mapping dialog.
- Available & Active Mappings: Clicking the arrow will unfold a list of the currently available and active mappings.
- Selected parameter: Displays the currently mapped parameter in Renoise.
- Channel: The MIDI channel currently mapped from your controller.
- CC No: The CC number currently mapped from your controller.
- CC Type: The type of MIDI CC controller.
- Absolute 7 bit: Use the CC value as an absolute value.
- Relative signed bit: Increase at [065 - 127], decrease at [001 - 063].
- Relative signed bit 2: Increase at [001 - 063], decrease at [065 - 127].
- Relative bin offset: Increase at [065 - 127], decrease at [063 - 000].
- Relative two's comp: Increase at [001 - 64], decrease at [127 - 065].
- Min: When mapping, for example, a MIDI fader or encoder to an effect parameter in Renoise, this allows you to set up the lower boundary of the controller.
- Max: This allows you to set up the upper boundary of the controller in Renoise. Tip: Swap min and max values to reverse the controller.
- Prefer 'Setting' instead of 'Toggling' On/Off states: Specify how the controller should change things that are turned On/Off in Renoise. See Set, Trigger and Toggle Mappings for a detailed description.
- Allow mapping the same Note/CC more than once: When enabled, you can assign the same controller button or fader (the same MIDI message) to multiple things in Renoise. As an example, this could be used for cross-fades of two track volume parameters.
- Record MIDI mapped parameters to automation: When enabled, any parameter changes you make with the MIDI controller will be recorded into either the Pattern Editor or Automation Editor. This only applies when Edit Mode is enabled.
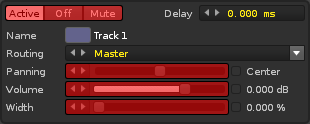
Note that the highlighted colour may vary according to the current interface Theme:
Create Mappings
- Click on a highlighted parameter or button.
- Send MIDI from your controller (press a key, push a button, move a fader etc.)
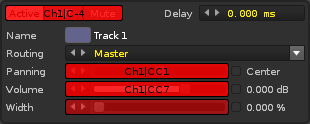
Renoise will automatically map the selected parameter to the chosen key/button/fader of the controller.
Note: When using endless encoders, which may send one of the relative CC modes noted above, slowly turn it to the left in order to map it. This allows Renoise to estimate how the encoder works (guess the relative CC modes) and stop you from having to keep manually resetting the mode.
Remove Mappings
To remove a mapping, open the MIDI Mapping dialog and click on the mapped part of the Renoise GUI. Then hit the Backspace or Delete key on your keyboard. Alternatively, press the "Clear" button next to the parameter description:
To clear all of the mapped parameters, click the "Clear" button at the top of the dialog (next to the "Load" and "Save" buttons).
Import/Export Mappings
If you want to share MIDI mappings you've set up, you can do so by importing/exporting them. To export, click on the "Save" button at the top of the dialog. This will prompt you for a file name and a location to save the mappings to. Exported settings can be imported by clicking the "Load" button and selecting a file.
Note that Renoise will not import/export parameter mappings as these are specific to Track Effects and so will be completely different for every song. What is imported/exported though, are the parameters found under "Global Mappings" in the "Available and active mappings" list, such as Start/Stop, select/trigger sequences etc.
If you want to repeatedly use the same mappings for your songs, then it might be useful to create a Template Song. Because all mappings are saved with a song, you can set up your favourite mappings in a blank song and save this as a template, enabling them by default for every new song.
Set, Trigger and Toggle Mappings
The list of "Available and active mappings" shows you all the possible parameters and functions that can be mapped in Renoise. This list contains far more entries than what is shown highlighted in the GUI. For example, there are mappings to select the currently active track, to control the selected Track Effects and much, much more.
Further, many things can be mapped in more than one way. Note the postfix of the mapping names in the list: [Trigger], [Toggle] or [Set].
- [Trigger]: Whenever your controller sends a command to Renoise, ignoring any values or states from the MIDI messages. This is, for example, used for things like "Start Playing" or "Stop Playing".
- [Toggle]: Allows the controller to only change an On/Off value, ignoring any values or states from the MIDI messages.
- [Set]: Allows the controller to specify exactly when something is On or Off, giving it total control.
To understand the difference between [Toggle] and [Set] better, let's take a look at what commands MIDI controllers may send out. Here is an example for a button that sends a MIDI controller change message:
A)
Button Pressed: Controller with Value 127 (or something above 64) is sent.
Button Released: Controller with Value 0 (or something below 64) is sent.
Button Pressed again: Same as before.
Button Released again: Same as before.
B)
Button Pressed: Controller with Value 127 (or something above 64).
Button Released: Nothing.
Button Pressed again: Controller with Value 0.
Button Released again: Nothing.
C)
Button Pressed: Controller with Value 127 (or something above 64).
Button Released: Nothing.
Button Pressed again: Controller with Value 127 is sent again.
Button Released again: Nothing.
Some controllers may use use protocol A, others B or C, or even other non-listed combinations. Renoise needs to deal with all of these possibilities, which is why the [Toggle] and [Set] options exist.
Now let's say you want to set something On or Off in Renoise. You have to tell Renoise how it should deal with the incoming messages. Take the global "Edit Mode" as an example, where there exists two variants for it in the list of available MIDI mappings:
- Edit Mode [Toggle]: Will ignore Controller Values of 0, so you can use controller protocol A or C.
- Edit Mode [Set]: Will not ignore Controller Values of 0, but will instead interpret them as "state": CC value > 64 On, CC value < 64 Off, so you can use controller protocol B with encoders or faders.
If you are unsure what the right mode is for your controller, simply try out both variants. If this works, then select that variant for the other mappings, because it's very likely that the controller sends MIDI in the same manner for the other buttons too. Note that Renoise will always choose the [Toggle] variant when executing MIDI "Learn Mode".
To automatically choose [Set] or [Toggle]:
When clicking on something in the Renoise GUI to create mappings, the "Prefer 'Setting' instead of 'Toggling' On/Off states" option in the MIDI mapping dialog defines which mappings should be used for your controller. [Set] will be selected when the option is enabled, otherwise [Toggle] is used. This way you only have to decide which type of mapping you want and can quickly create the mapping without using the "Available And Active Mappings" list.
Dynamic Mappings
The list of "Available and active mappings" shows you all the possible parameters and functions that can be mapped in Renoise. This list contains far more entries than what is shown highlighted in the GUI. For example:
Selected Track Mappings
- Global Mappings/Navigation/Tracks: Allows you to switch over to the next or previous track in Renoise.
- Global Mappings/Track Muting/Current Track: Allows you to mute/unmute the currently selected track.
- Global Mappings/Track Levels/Volume/Current Track: Allows you to control the volume of the current track.
- Global Mappings/Track Levels/Panning/Current Track: Allows you to control the panning of the current track.
Using this you can control every track in a song with just a few buttons and faders on your controller.
Selected DSP FX Mapping
The same is also possible for DSP Effects:
- Global Mappings/Navigation/Track DSPs/Select: Mapping the selection of DSP effects.
- Global Mappings/Track DSPs/Selected FX/Parameter #XX: Controlling up to 32 DSP effect parameters.
- Global Mappings/Track DSPs/Selected FX (Mixer Subset)/Parameter #XX: Controlling up to 32 DSP effect parameters in the Mixer.
When using the "Selected FX (Mixer Subset)" mappings, only the DSP effect parameters which are seen in the Mixer can be controlled. This allows you to customise which parameters are seen (right-click on the FX in the Mixer and choose a parameter from the "Show Sliders" option) and controlled, so you can quickly and easily navigate through a small subset of parameters during a live performance.
Just like the track and effects, the sequencer can be also be controlled in a dynamic manner. Feel free to explore this on your own, using the above information as a guide.
The Duplex Tool
Renoise Tools are downloadable packages that extend the functionality of the program, using the Renoise Scripting API. Created with this, Duplex is a flexible system for using external controllers in Renoise. When you install Duplex, each supported device has a number of configurations that control important Renoise parameters like the Mixer, Matrix or Effects. You can combine these so-called 'applications' to form your own, unique mix of features. For example, some pre-installed device configurations have entries like 'Mixer+Effect'.
You can download and find more information about the Duplex Tool at its page in the Renoise Tools section of the site.
