Sampler Keyzones
Keyzones
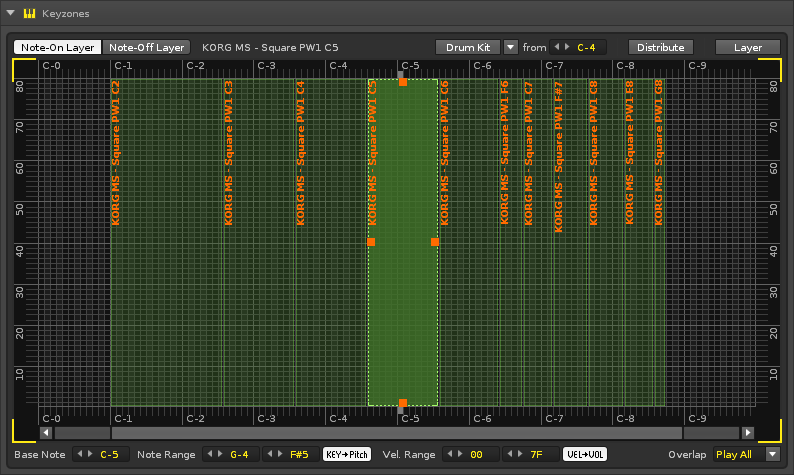
For each sample, the Keyzones editor can create a zone that stretches across a range of key and velocity values. When a note is played, any sample whose Keyzone contains that note's key/velocity co-ordinate will be triggered. This can be done for both Note-On (key press) and Note-Off (key release) inputs, via separate layers.
The Interface
The Keyzones interface consists of a large central section that displays the zones, with various options above and below. The note range that can be played within Renoise (C-0 - B-9) is represented horizontally, while the velocity range of 00-80 is shown vertically. This grid is used to create a Keyzone's range for a sample. Playing notes will display their coordinates on the grid.
Placing the mouse pointer over the grid and scrolling the mouse wheel will zoom in/out, giving you access to more/less detail horizontally and the scrollbar underneath can be used to move around.
Creating Keyzones
Selecting & Adjusting the Zones
A zone can be selected by left-clicking on it or by selecting a sample from the Sample List. This becomes the active zone with a highlighted colour and small squares on of each of its four sides. Now if you left-click and drag a side you can resize the zone. Doing this on the zone itself will move it around. It is possible to have overlapping zones, so that multiple samples can be triggered at once with a single note.
If you hold down the left Shift key and left-click on another zone, both this and the active zone are selected, along with any zones between them on the grid. You can also left-click (anywhere other than the active zone) and drag to select a range of zones. If you hold the left Ctrl key (Command on Mac) and left-click on zones, they will become selected/deselected, allowing you to pick any combination from the grid. When multiple zones are selected, any changes made to the active zone will also affect the others.
File:2.7 instrument samples keyzones selection and alteration.gif
If the Auto-select option in the Sample List is enabled, zones will be automatically activated by notes played within their range.
Inserting & Deleting Zones
To insert a new Keyzone, right-click on the grid to open the context menu and choose "Insert New -> Load Sample(s)..." and load the sample(s) you would like to use this new zone for. Alternately, select one or more samples from the Disk Browser, drag them onto the Keyzone grid and place them where you want (their horizontal size can be adjusted by moving the mouse pointer up and down before letting go of the mouse button).
A zone can be deleted by selecting it and pressing "Delete" or using the right-click menu and selecting "Remove".
File:2.7 instrument samples keyzones drag and drop.gif
Automatically Assigning Zones to Samples
Pressing the Distribute button in the top right corner of the interface will evenly distribute the number of samples in an instrument across the entire key range.
Just to the left of this, the Drumkit button will assign each sample to a single key, starting from the note selected in the value box to the right. Using the menu button just to the right of the Drumkit button, two additional options can be selected. "Use White Keys Only", will obviously only assign zones to the white keys, while "First Octave for Transposing" will assign an entire octave to the first sample of the instrument.
File:2.7 instrument samples keyzones drumkit distribution.gif
Assigning A Basenote To A Keyzone
Right clicking on the key range at the top or bottom of the grid will change the Basenote of the currently selected zone (this can also be changed using the Basenote option at the bottom left). To assign a basenote to a Keyzone, first select the Keyzone and then either right-click the key of the keyboard you wish to use or change the value with "Basenote" value box in the lower-left corner of the interface. The basenote of the currently selected Keyzone is shown by a black dot on that key of the keyboard.
When Keyzones are created by dragging and dropping from the sample-list or Disk Browser, the basenote will be automatically assigned. The basenote for a Keyzone will be unchanged when moving it around in the grid.
File:2.7 instrument samples keyzones manually adjusting keymappings.gif
Using Instrument Envelopes
File:2.7 instrument keyzone envelope button.png At the bottom right corner of the interface is the "Use Instrument Envelopes" button. With this you can enable and disable the use of the Instrument Envelopes for each individual Keyzone.
File:2.7 instrument keyzone velocity button.png To the left of this is the "Map Velocity To Volume" button, which will, when disabled, always play the sample at full volume. This can be useful when mapping samples which are already sampled at lower volumes.
Note On/Off Layers
At the top left of the interface are two buttons that switch the grid focus between creating Keyzones for Note-On and Note-Off inputs. This gives you the option of triggering samples for both the pressing and releasing of a key. The Basenote and Use Instrument Envelopes options also function independently between layers.
By assigning a note no Keyzone in the Note-On layer, but having one in Note-Off, it is possible to have a sound only play when a key is released.
File:2.7 instrument samples keyzone note on off layer.png
Using Keyzones with a Sliced Sample
With a sliced sample your options are far more limited. Zones cannot be adjusted by velocity and (aside from the initial sample) can only be a single key in width. Additionally, zones cannot be inserted into the Note-Off layer and you have no control over the use of Instrument Envelopes. However, the Drumkit button and its options are still available.
