Disk Browser
Disk Browser
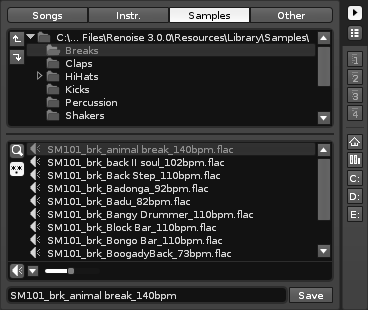
Located at the bottom right corner of the interface, the Disk Browser allows you to load and save files, preview samples or instruments and store your favourite locations for quick access.
Load & Saving Files
To load a file simply double-click on it in the file list. To save a file, type the desired name into the text box at the bottom and press the Save button.
File Types Selector
Using this panel you select what file type to load or save. Note that the File Panel will display all of the files that Renoise is capable of reading, but the files which are relevant to the selected file type are highlighted and listed at the top.
 - Load and save Renoise Song files (XRNS), or load other song formats that Renoise can import (see below for full list).
 - Load and save Renoise Instruments (XRNI files).
 - Load (see below for format list) and save samples (saving will always save in WAV format).
 - Load other Renoise file types (saving is done by other means).
Depending on the file type selected, Renoise may also show some additional options & buttons at the bottom:
- Song: A "Render" button will appear, which will open the render dialog box and allow you to render the current Song as a .wav file.
- Instr./Sample: A small pre-hear icon and a volume slider will appear. When enabled, samples will play when selected in the file list and instruments will play when loaded. Clicking the small arrow next to the slider allows selection of whether the sample/instrument will be played back on the Master Track or the currently selected track (including all track effects).
Supported Formats For Song Importing
- .xrns, .rns, .ptk, .ntk - Renoise Songs
- .xm - FastTracker II
- .it - ImpulseTracker II
- .mod - Amiga Mod
- .mid, .midi - standard MIDI
Supported Formats For Sample Importing
Lossless
- .aif, .aiff - AIF wave (uncompressed only)
- .wav - PCM wave (uncompressed only)
- .fla, .flac - Flac audio
- .aifc - compressed AIF (requires Quicktime)
- .au, .snd - rare Mac formats (requires Quicktime)
- .caf - Core Audio file format used by many Apple apps (requires Quicktime)
Lossy
- .ogg - Ogg Vorbis
- .mp2, .mp3 - standard MP2/3 (requires mpeg123 on Linux)
- .m4a, .mp4 .mp4a, .aac - new MP4, AAC format (requires Quicktime)
Folder Panel
Initially, only the current folder will be shown, with the arrow at the right moving the list to the parent directory. To expand the Folder Panel and show the directory tree, click-grab the bar shown below and drag down:
The Folder Panel gives you an overview of the directory structure. Left-clicking on a folder will display its contents, while double-clicking will enter the folder.
- File:Vvoois renoise folder up.png - Go up one level in the directory hierarchy.
- File:Vvoois renoise folder root.png - Set current folder as new root directory (only show folders below the current position).
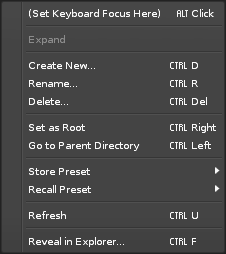
Right clicking on a directory within the Folder Panel will also present you with more options:
To the right of the folder panel are four numbered buttons, which are user-configurable presets that can be assigned to your favourite file locations. Right-clicking a button will store the current File Panel directory as a preset. Left clicking will recall a previously stored location. Each file type (Song, Instrument, Sample and Other) has its own set of four customisable presets. Hovering over a preset button with the mouse will show its full directory path.
Below this are a set of common default locations: your home folder, the default library folder (different for each file type: Song, Instrument, Sample and Other) and a list of all available installed system drives.
File Panel
The contents of the selected directory are displayed in the File Panel. By default, only files that are readable by Renoise are shown.
- File:Vvoois renoise file search.png - Type in a search phrase to filter the file-list.
- File:Vvoois renoise file wildcard.png - When enabled, all file types are shown, not just the ones readable by Renoise.
 - Save a file (the file is named using the text box to the right of the save button).
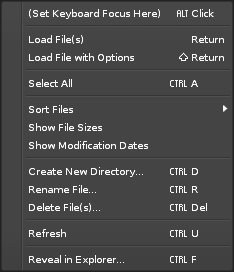
Right clicking on any file will present more options:
File-Context menu
"Load file with options" can be used to specify exactly how a file should be imported. The options available to you change depending on the type of file selected. They are as follows:
WAV File Import Options
File:2.8 audiofile-importoptions.png
RAW Audio File Import Options
File:Vvoois renoise file options raw.png
MIDI File Import Options
File:Vvoois renoise file options midi.png
Device Chain File Import Options
File:Vvoois renoise file options dsp chain.png
Resizing The Interface
The interface can be expanded horizontally by left-click-dragging the left edge of the panel, and vertically by left-click-dragging on the bar between the Instrument Properties and the Disk Browser.
 - Closes or opens the entire right panel, hiding both the Instrument Selector and the Disk Browser. Note that when closed, the visibility icon below will move next to the Scopes icons, allowing you to still view the Instrument Selector.
 - Toggles the visibility of the Instrument Selector.
Loading Multiple Entries at Once
You can load multiple sample or instrument entries by ctrl-clicking individual files and/or shift-clicking to select a range of them. The selected files can then be loaded using the context menu or dragged into a specific spot. Samples can be dragged into the instrument-list area and have an instrument created for each sample, or dragged into the sample-list area and be loaded into a single instrument.
File:2.7 disk browser loading instruments and samples.gif
The default keyboard focus of Renoise is set to control the Pattern Editor, but you can also activate other parts of the interface for keyboard navigation. You can achieve this through by any of the following methods:
- Right click on the File Panel or Folder Panel to show the context menu and select "(Set Keyboard Focus here)".
- Navigate the keyboard focus through the various interface areas with the [Control/Command + Tab], [Control/Command + Shift Tab] shortcuts.
- Click with the middle mouse button on the File Panel or Folder Panel.
Importing Raw Audio Files (Convert Any File to Audio Sample)
Renoise is able to load anything (yes, any file type) as an audio sample file. In order to do this:
- Select the "Sample" category in the File Selector.
- Make sure the "Show All Files" option is enabled.
- Double click a file which is not normally recognized as a sample file (TXT document, JPEG picture, AVI movie etc.)
- Additionally, right-clicking on the file and selecting "Load File with Options" gives you additional options for importing (sample rate, bit depth etc.)


