Sampler Waveform: Difference between revisions
No edit summary |
|||
| Line 184: | Line 184: | ||
You can create new samples by recording them from various sources, including a line-in jack or microphone. To do so, press the [[Image:3.1_waveform-record.png|text-bottom]] button found at the top left of the Waveform panel. Or in Renoise, choose, ''"File->Record New Sample..."'' from the main menu at the very top left of the interface. | You can create new samples by recording them from various sources, including a line-in jack or microphone. To do so, press the [[Image:3.1_waveform-record.png|text-bottom]] button found at the top left of the Waveform panel. Or in Renoise, choose, ''"File->Record New Sample..."'' from the main menu at the very top left of the interface. | ||
To begin recording new samples, first configure the device you want to use for recording. For Redux, this is set up inside the host DAW, so refer to its specific documentation. In Renoise, this is done via the [[Preferences#Audio|''"Edit->Preferences->Audio"'']] panel, but is only necessary when using DirectSound (Windows), Core Audio ( | To begin recording new samples, first configure the device you want to use for recording. For Redux, this is set up inside the host DAW, so refer to its specific documentation. In Renoise, this is done via the [[Preferences#Audio|''"Edit->Preferences->Audio"'']] panel, but is only necessary when using DirectSound (Windows), Core Audio (MacOS) or ALSA (Linux); ASIO is pre-configured to be used as a recording and playback source. When your soundcard has more than one input channel you'll be able to choose from them in the Audio Preferences or the recording window. | ||
'''Renoise only:''' Opening the recording window and controlling the main record options can be mapped to a MIDI Controller with the [[MIDI Mapping]] options. This way you can quickly make new recordings using just your MIDI controller or master keyboard. | '''Renoise only:''' Opening the recording window and controlling the main record options can be mapped to a MIDI Controller with the [[MIDI Mapping]] options. This way you can quickly make new recordings using just your MIDI controller or master keyboard. | ||
Latest revision as of 17:06, 17 March 2022
Waveform
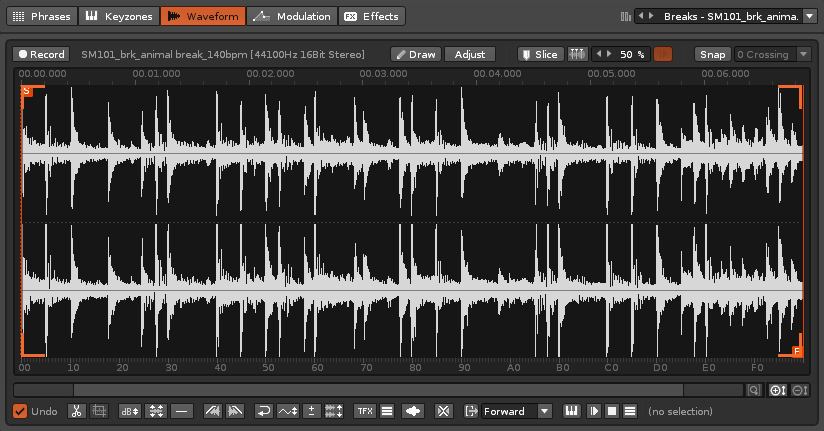
The Waveform editor displays an instrument's samples so you can edit them with the provided tools and see the results graphically. New sounds can be recorded directly into the Sampler from external sources, or created by hand with the simple Draw tool. Existing samples can be imported and any changes made are exclusive to each individual song or instrument. The source samples are never modified unless you explicitly overwrite the file by saving it in the Disk Browser. Besides being non-destructive, the Sampler also supports endless undo/redo-ing of all your actions.
Samples (.flac) can be loaded and saved as presets using the drop-down menu located at the top right corner.
The large central section displays the waveform and allows you to select parts of the sound for editing. Loop points and Slice markers are also placed and displayed here. The top section features the sample-type options, Draw, Slice and Snap controls. The lower section contains the options used to edit or modify the sample, with additional options available via the right-click context menu.
Working With The Waveform
Upper and Lower Rulers
Directly above and below the waveform are rulers which display various time measures. You can set the measures individually by right-clicking on a ruler and selecting an option from the menu:
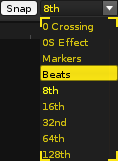
- 0S Effect: The waveform is automatically split into 256 equal parts. Sample playback can be triggered from the position of one of these parts using the 0S Effect Command (this behaves differently if the sample has been sliced).
- Beats: Measures how many beats the waveform lasts for. This will change depending on the song's current BPM.
- Samples: These are the individual data points that the waveform is constructed from. At a sample rate of 44.1KHz, there are 44,100 samples in a single second.
- Minutes: This will show the time in minutes, seconds and fractions of a second.
- Left Mouse Button:
- Single-click sets a cursor (edit/play) position.
- Click and drag spans an area in the editor. In a stereo sample, moving the mouse pointer above/below the top/bottom 0dB line will allow you to select the left or right channel only.
- Click and drag with "Left Shift" extends/shrinks either side of the selection area.
- Double-click selects the entire visible area of the waveform.
- Click, drag and move the cursor past the left/right side of the waveform editor to select while zooming out. Holding down "Left Ctrl" ("Command" on Mac) while doing so will speed up the zooming.
- Right Mouse Button:
- Single-click opens the context menu.
- Click and drag extends/shrinks either side of the selection area (same as left-click and drag with "Left Shift").
- Click, drag and move the cursor past the left/right side of the wave editor to select while zooming out. Holding down "Left Ctrl" ("Command" on Mac) while doing so will speed up the zooming.
- Middle Mouse Button:
- Single-click plays the sample from the clicked position to the end of the visible waveform. In a stereo sample, moving the mouse pointer above/below the top/bottom 0dB line will play the left or right channel only.
- Click and drag selects an area then immediately plays that selection.
- Scroll Wheel:
- Zoom in/out of the waveform. Note that the zooming happens from the position of the mouse pointer.
- Hold "Left Alt" while scrolling to scroll horizontally instead of zooming.
Keyboard Shortcuts
- Arrow Left/Right: Move cursor position to the left/right. In combination with "Left Shift", a selection is created.
- Arrow Down/Up: Move cursor position up/down (in a stereo sample).
- Ctrl/Command + Arrow Down/Up: Zoom in/out at the cursor position.
- PageDown/PageUp: Zoom in/out vertically.
- Home/End Key: Move cursor to the start/end of the waveform. In combination with "Left Shift", a selection is created.
- Enter: Play/restart the sample from cursor position.
Standard operations such as Copy/Paste ("Left Ctrl + C/V") etc. are available as well.
Lower Scroll/Zoom Bar
As an alternative to using the mouse or keyboard shortcuts to navigate around in the waveform, you can use the scrollbar beneath the Lower Ruler to scroll or zoom. Drag the bar to scroll or drag the side handles to zoom. Clicking on a free space next to the scrollbar will jump to the immediate left or right of the waveform's current location. Just to the right of the scollbar are extra zooming controls:
 - View full sample (zoom back out to show the whole sample, horizontally and vertically).
 - Zoom in one step vertically.
 - Zoom out one step vertically.
Upper Control Bar
Recording
 - Found at the top left of the Waveform panel. Opens up the recording window to record new samples from various sources (e.g. microphone, line-in etc.) For further details, see the Recording New Samples section.
Drawing
 - The Draw button is located at the top center of the Waveform panel. Draw mode allows you to draw on the central waveform area with the mouse, where you can create brand new sounds or make adjustments to existing sounds, such as removing clicks.
Create/Adjust Sample Properties
Changes the basic properties of an existing sample or, in a blank sample slot, creates a new sample. This is located at the top center of the Waveform panel.
Slice Markers
By placing markers onto a sample it can be sliced up. Those slices can then be used as if they were individual samples themselves. This process is non-destructive because the original sample is left untouched. The slicing controls are located at the top right of the interface.
 - Activating the Slice Marker Tool allows you to left-click on the waveform to place the markers at useful points - individual drum hits, notes, vocal phrases etc.
 - Automatically insert markers into the waveform at points where significant changes within the waveform are detected (beats/transients).
 - The sensitivity of the auto-slicing beat detection can be adjusted using this value box. Higher values will lead to more markers being inserted.
 - If enabled, a triggered slice will stop playing at start of the next slice. Can only be changed while the original sample is selected.
As markers are placed onto a sample, the Keyzones editor will automatically assign the new slices to different notes according to its current Drum Kit settings, allowing you to trigger each slice from a different key on the keyboard. You can also trigger a slice via the -Sxx Effect Command, where the xx value corresponds to a slice number. Each slice you place is given a numbered tab at the top and left-click-dragging on it will move the slice around.
Right-clicking on a tab will bring up a menu with the option to: select all markers, delete the current marker or delete all markers. There’s also the powerful “Render Slices To Phrase” feature and its various options, which will reconstruct the original sample as a phrase using some or all of the slices.
Although you can still edit the original sample, you cannot edit the individual sample slices. However, the Loop type and all Sample Properties like volume, panning etc. can be changed per slice. A newly created slice will inherit the original sample's properties. To destructively render an instrument's slices into individual samples, right-click on the waveform and select "Slices > Destructively Render Slices" from the menu.
You may find it useful to watch our "Sample Slicing" video.
Snapping
The Snap controls are located at the top right of the interface.
Snapping applies to the waveform when selecting with the mouse, using keyboard shortcuts to navigate, and when applying or dragging loop points and slice markers. It can be useful to have "0 Crossing" enabled, as this will ensure that cutting and pasting parts of a sample does not produce clicks in the audio, because the start and end points will always match up at 0dB.
Selecting "0S Effect" will snap to the 0S markers typically shown along the bottom of the waveform, while selecting "Markers" will cause the selection to "stick" to sample slice markers as the mouse pointer approaches them.
Snapping to beats (the length of time for a single beat) is useful when cutting out beats from loops, in combination with the "Copy Into New Instrument" context menu/keyboard shortcut. The other Snap options are smaller fractions of a beat.
Processing Controls and Options
Located underneath the waveform, most of the processing options below will apply to the whole sample unless a specific area has been selected.
Undo/Redo Support
 - Enable/disable undo in the Waveform editor. When working with very large samples, temporarily disabling undo may be useful to save time. All undo/redo processing is saved to disk, so running out of memory should not be a problem.
Cut/Copy/Paste
 - Cut the selection (or whole sample if nothing is selected).
 - Trim to selection (delete everything outside of the selection).
Amplitude
 - Change the volume of the sample or selection (will open up a window to specify the exact amount).
 - Raise the volume of the sample or selection to the maximum possible value without clipping.
 - Insert silence into the selected range, or silence the whole sample if no range is selected.
Fading
 - Fade the sample in linearly (can fade logarithmically via the right-click context menu or shortcuts).
 - Fade the sample out linearly (can fade logarithmically via the right-click context menu or shortcuts).
Reverse & Swap
 - Reverse the sample or selection.
 - Center the sample or selection to the DC line, correcting any unwanted DC offsets. You may find it useful to watch our video on the subject.
 - Invert the phase of the sample or selection.
 - Swap the left and right channels of the sample or selection. Only possible for stereo samples.
Process Track FX
 - (Redux only) Apply the selected sample fx chain directly to the sample's waveform. Note that this will not automatically extend the length of the sample for reverbs, delays etc. that last longer than the original sample.
 /
/  - (Renoise only) Apply the selected track/sample fx chain directly to the sample's waveform (applies both native and plugin effects). Note that this will not automatically extend the length of the sample for reverbs, delays etc. that last longer than the original sample.
 - (Renoise only) Select between track and sample fx chains for the previous option.
 - Smooth the sample. A simple interpolation process which removes hiss and sharp edges from the waveform. Useful to smooth out hand-drawn samples.
Loop Controls
 - Automatically create a smooth cross-faded loop.
 - Toggles whether a sample will instantly stop or finish its current loop after a Note-Off input.
 - When looping is enabled by selecting a loop type from the menu, start and end points are inserted into the waveform, causing playback to loop between them. The loop points can be moved by click-dragging their tabs at the top/bottom of the waveform.
- Off: No loop.
- Forward: Loop playback from start to end.
- Reverse: Loop playback from end to start once the end point is reached.
- PingPong: Loop playback from start to end to start to end etc.
Other Controls & Info
 – When enabled, the computer keyboard and MIDI note input will play the sample from the cursor position to the end of the visible waveform, or play the selection if one is present. This bypasses any Phrases, Keyzones, Modulation and Effects, but is unaffected by the track-select option to the right.
 - Start/Stop playing sample from the cursor position to the end of the visible waveform, or Start/Stop playing the selection if one is present.
 - (Renoise only) Select where the sample will be played back: On the Master Track to bypass the current track's effects, or on the selected track to hear the sample with the currently active effects.
 - The current cursor position or selection range positions are shown in the format of the Lower Ruler. To change the format, right-click on the Lower Ruler and choose from the list.
Right-Click Context Menu
Right-click on the waveform to open this menu. There are extra processing options beyond the ones detailed above:
- Mix Paste: To use this, "Copy" a sample or a selection of a sample into the clipboard. When you select "Mix Paste" from the menu, a window will appear that offers options for mixing the clipboard content with the existing content.
- Copy Into New Sample/Instrument: Automatically copies a selection of a sample and places it in either the current instrument or a new instrument. This can be very useful when copying parts of a large sample for further playback and editing.
- Process
- Fade In/Out Logarithmically: Fades the selection area in/out logarithmically instead of with the standard linear process.
- Set Loop Start/End: Inserts a loop start/end point directly onto the cursor position. If a selection area is present then both the start and end points will be placed to loop that exact range.
Copy/Paste With External Sample Editors (Windows only)
On Windows, the clipboard content is shared with the entire system, meaning you can quickly swap sample data to and from Renoise/Redux when using an external sample editor that supports this feature. In many external editors you have to select/activate this feature first. To find out how to do this, please look at the external editor's manual and search for the keywords: "System Clipboard", "Copy".
Recording New Samples
You can create new samples by recording them from various sources, including a line-in jack or microphone. To do so, press the ![]() button found at the top left of the Waveform panel. Or in Renoise, choose, "File->Record New Sample..." from the main menu at the very top left of the interface.
button found at the top left of the Waveform panel. Or in Renoise, choose, "File->Record New Sample..." from the main menu at the very top left of the interface.
To begin recording new samples, first configure the device you want to use for recording. For Redux, this is set up inside the host DAW, so refer to its specific documentation. In Renoise, this is done via the "Edit->Preferences->Audio" panel, but is only necessary when using DirectSound (Windows), Core Audio (MacOS) or ALSA (Linux); ASIO is pre-configured to be used as a recording and playback source. When your soundcard has more than one input channel you'll be able to choose from them in the Audio Preferences or the recording window.
Renoise only: Opening the recording window and controlling the main record options can be mapped to a MIDI Controller with the MIDI Mapping options. This way you can quickly make new recordings using just your MIDI controller or master keyboard.
Recording Controls
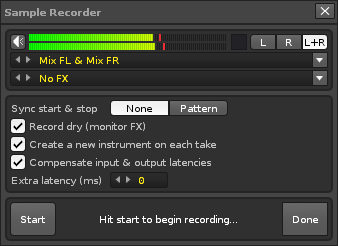
This VU meter displays incoming audio activity, allowing you to monitor the signal and make adjustments if necessary. The ![]() button lets you listen to the input through Renoise/Redux while recording.
button lets you listen to the input through Renoise/Redux while recording.
Select which channel you would like to record: left, right or both (stereo).
Everything below this point applies to Renoise only.
Select the input device that will be the source for the recording. This may not be present depending on your selected Audio Device.
Select the track effect chain that will be used with the recording. The "Record dry (monitor FX)" option allows you to either directly apply this onto the recording or just hear it with the recording preview.
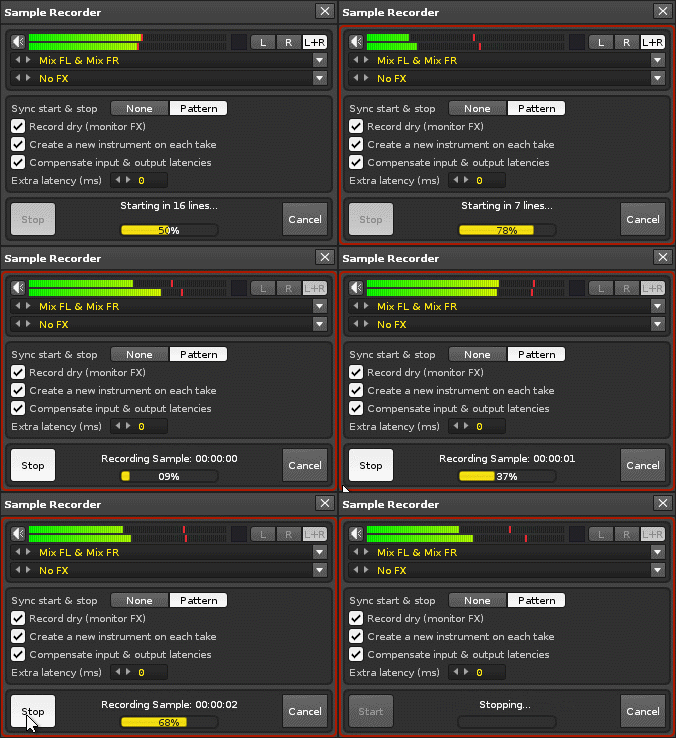
- Sync start & stop:
- None - No quantization is applied. Hitting the start/stop button will start/stop recording immediately.
- Pattern - Applies quantization from the start to the end of the current pattern. When the song or pattern plays, recording will be started or stopped only at pattern boundaries or block loops. This is useful to record "live" (e.g. playing a guitar riff along to your Renoise song). The resulting samples can then be placed into the patterns and will always match your song.
- Record dry (monitor FX): When enabled, the input signals are recorded without the Track FX applied, but will be previewed with them. This way you can hear and record exactly what will be played later when adding the recorded sample to the selected track.
- Create a new instrument on each take: When enabled, each recording is placed into a new instrument slot in the Instrument Selector, so you can simply hit start/stop again and again to create multiple takes without overwriting anything.
- Compensate input and output latencies: When enabled, the latency of your soundcard will automatically be compensated for when creating synced recordings.
- Extra latency (ms): Soundcards or other devices can introduce latencies that Renoise may not be aware of. When your recordings are slightly out of sync on playback, you can manually compensate the latency offset of future recordings here.
- Start: Start or stop the recording (changes into "Stop" when recording has started).
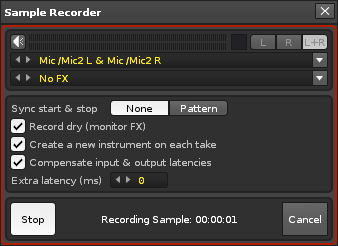
- Done: Closes the recorder window when no recording is taking place. While recording, this will "Cancel" the current recording.
Recording Without Quantization
Once everything is set up, hit "Start" to begin recording. A red border will appear around the recording window to indicate that recording is active. To stop recording and load the sample into the instrument slot, simply hit the "Stop" button. Currently active recordings can be discarded by pressing "Cancel".
Recording With Quantization
When using the quantization (Sync start & stop) option, Renoise will make sure that recordings are started and stopped at pattern boundaries only. To use the sync you have to start playing the song first. A progress bar will display playback information.
