Sampler Modulation: Difference between revisions
No edit summary |
No edit summary |
||
| Line 150: | Line 150: | ||
=== LFO === | === LFO === | ||
The | The Low Frequency Oscillator generates a signal that cycles through a relatively slow pattern. The signal is constructed by applying the various parameters to a repeating waveform, which can be chosen from four simple shapes. | ||
[[Image:3.1_modulation-lfo.png]] | [[Image:3.1_modulation-lfo.png]] | ||
* '''Mode:''' | * '''Mode:''' | ||
** [[Image:3.0_lfo-sine.png|text-bottom]] - Sine wave | ** [[Image:3.0_lfo-sine.png|text-bottom]] - Sine wave | ||
** [[Image:3.0_lfo-saw.png|text-bottom]] - Sawtooth | ** [[Image:3.0_lfo-saw.png|text-bottom]] - Sawtooth | ||
** [[Image:3.0_lfo-square.png|text-bottom]] - Pulse | ** [[Image:3.0_lfo-square.png|text-bottom]] - Pulse/Square | ||
** [[Image:3.0_lfo-random.png|text-bottom]] - Random | ** [[Image:3.0_lfo-random.png|text-bottom]] - Random | ||
* '''Frequency:''' The speed of the oscillation. | * '''Frequency:''' The speed of the oscillation. | ||
* '''Amplitude:''' The maximum range that the value will oscillate to. | * '''Amplitude:''' The maximum range that the value will oscillate to. | ||
* '''Dephase:''' Changes which part of the oscillation cycle that the output will start at. | * '''Dephase:''' Changes which part of the oscillation cycle that the output will start at. | ||
* '''Delay:''' The start of the | * '''Delay:''' The amount of time at the start of the modulation that the LFO cycle will be delayed by. | ||
=== Operand === | === Operand === | ||
Latest revision as of 18:20, 12 October 2021
Modulation
Adding modulation to samples greatly expands the possibilities of their sound beyond the original audio. The modulation is created by inserting devices into an interactive chain, constructing an envelope. Separate envelopes are used to modulate the three basic domains of a sample - Volume, Panning and Pitch - and an optional filter with its own domains. These various envelopes are collected together as a Modulation Set, which can be used to affect any number of samples simultaneously. Modulated samples are processed polyphonically (each instance of a sound is generated independently).
Modulation Sets (.xrno) can be loaded and saved as presets using the drop-down menu located at the top right corner.
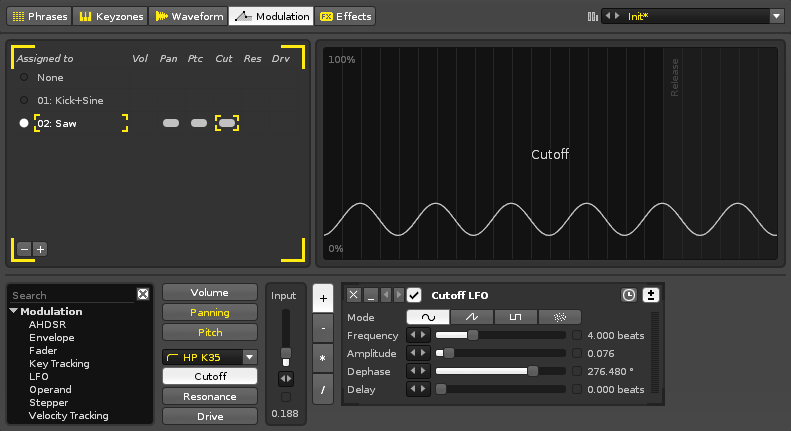
The interface is split into three sections. At the upper-left is the Set list, the large section to the right of this shows a graphical representation of the selected domain's envelope, and the lower section contains the domain selector and device chain.
The Set List
A Set is a collection of modulation envelopes that affect various sample domains. Any number of Sets can be created and each instrument has its own unique Set list. The individual samples of an instrument can be assigned any one of its Sets, allowing different samples to be affected by modulation in different ways. A Set can also be assigned to multiple samples simultaneously, so any changes made to a Set will affect all linked samples.
The Set assigned to the current sample is marked with a circle at the list's left. Clicking on an empty circle slot will assign that Set to the sample. Clicking anywhere else on a Set will select it for editing. Double-clicking on a Set's name allows you to rename it.
Modulation Sets can be added or removed using the buttons at the bottom left:
Right-clicking on a Set will select it and open a context menu with additional options:
- Cut All Devices: Cut all of the Set's devices.
- Copy All Devices: Copy all of the Set's devices.
- Paste All Devices: Paste all of a previously copied Set's devices (overwrites the selected Set).
- Delete All Devices: Delete all of the Set's devices.
- Insert New Set: Insert a new blank Set below the selected Set.
- Delete Set: Delete the Set.
- Duplicate Set: Create an identical copy of the Set.
- Load: Load in a Set (will overwrite the selected Set).
- Save As: Save the currently selected Set.
Creating Modulation Sets
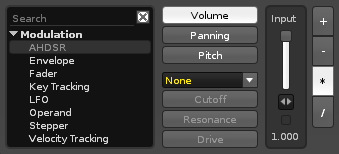
The bottom section of the Modulation interface is dedicated to the creation of envelopes for the three basic domains of a sample: Volume, Panning, Pitch, as well as other optional filter domains (they will be unavailable until a filter is chosen from the drop-down menu). Each domain has its own Input slider, which is used to adjust the starting value of the envelope.
The envelope is constructed by inserting modulation devices, creating an interactive chain. To add a device from the list, either double-click on it or drag and drop it into the chain at the desired position. Positioned before each device are four buttons which change how the envelope will be altered by the output value of that device: Add, Subtract, Multiply and Divide. The envelope graphic in the top right panel will show the real-time results of changes made to the device chain.
Note: The Pitch domain has an extra control at the top-left of the envelope panel, where you can control the Pitch Range that the modulation will take place within (1-96 semitones).
Modulation Devices
Note that the name of a device will change to reflect the domain it is modulating, e.g. Volume LFO, Panning LFO, etc.
Common Device Layout and Controls
Each modulation device has a standard set of buttons to perform common functions:
 - Remove the device from the chain.
 - Minimize/maximize the device.
 - Move the device to the left or right. Right-click to move to the start or end of the chain.
 - Enable/disable the device.
 - Toggle synchronizing the device to milliseconds or beats. Not present on all devices.
 - Toggle values to bipolar (positive and negative) or unipolar (only positive).
Right-click Context Menu
Right-clicking on a device will select it and open a context menu with additional options:
- Cut: Cut the device.
- Copy: Copy the device.
- Paste: Paste the previously copied device after the selected device.
- Delete: Delete the device.
- Rename: Rename the device.
- Bypass/Activate: Enable/disable the device.
- Copy Settings: Copy the parameter settings from the device.
- Paste Settings: Paste the previously copied settings into the selected device. Note that settings cannot be pasted between different types of devices.
- Init Settings: Reset the device settings to their default values.
- Modulation Set: The options function exactly as they do in the Set List, with the addition of:
- Append: Paste a previously copied Set's device chains onto the end of the existing chains.
- Min/Maximize All: Min/maximizes all devices in the Set.
AHDSR
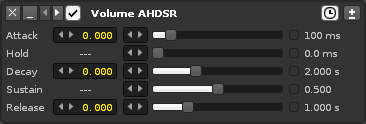
The AHDSR device is an envelope whose five properties alter its shape over time. By default, interpolation between different values of the phases happens in a straight line, but Attack, Decay and Release have an additional parameter to create curves and control their easing. You may find it useful to watch our video on this subject.
- Attack: How quickly the value rises up from zero.
- Hold: The value is held for this length of time before falling.
- Decay: How long it takes for the value to decrease to the percentage level set by Sustain.
- Sustain: The value will be sustained at this level until a Note-Off (key release) event.
- Release: How long it takes for the value to fall to zero.
Envelope
This device is a heavily customisable envelope with additional Sustain and Release properties.
The main graphical section of this device displays the envelope and the points used to create it. Left-clicking on a point will select it and click-dragging will move it around. Using "Left Ctrl" will display the current value of a point and also lock it in place horizontally, allowing you to fine-tune its value vertically. Double-clicking in the envelope will create a new point, while double-clicking on an existing point will remove it. For more advanced editing options, see the Using The External Editor section.
The following options are directly under the envelope graphic, from left to right:
- Time: The selected point's location in time.
- Value: The value of the selected point. Left-click to enter a new value.
- Envelope Type: Dictates how the envelope's value will change over time.
- Points: Only changes value when a point is encountered.
- Lines: Initially interpolates in a straight line, but the handles between points can be used to create curves and control their easing.
- Curves: Interpolates with a smooth cubic curve, easing into and out of points.
- Length: Length of the envelope.
These are the options found on the right side of the device:
- Ext. Editor: This will open the envelope graphic in the large central section of the Modulation interface, allowing for finer control over details and access to additional tools. For more details, see the Using The External Editor section.
- Loop: When looping is enabled by selecting a loop type from the menu, start and end points are inserted into the envelope, causing playback to loop between them. The loop points can be moved by click-dragging their tabs at the top/bottom of the envelope.
- Off: No loop.
- Forward: Loop playback from start to end.
- Reverse: Loop playback from end to start once the end point is reached.
- PingPong: Loop playback from start to end to start to end etc.
- Sustain: When enabled, a Sustain line will appear in the envelope and can be moved by dragging the top tab. When playback reaches the Sustain line, it will be held there until a Note-Off (key release) event.
- Release: Changes how long it takes for the volume to fall to silence after a Note-Off (key release) event. Higher values equal less time. Only available for the Volume envelope.
- Presets: Store and recall your favourite envelope settings. Right-clicking will save a preset, while left-clicking will restore a previously saved preset. Presets are stored by Renoise/Redux and will show up every time you use the Envelope device in future.
Fader
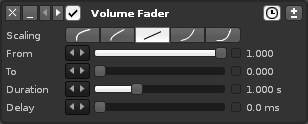
A configurable fader used to create a variety of fade in/outs.
- Scaling: The scaling that will be applied to the fade. The default is linear, but you can also select from two exponential and two logarithmic scales.
- From: The starting value.
- To: The ending value.
- Duration: The length of time the fade will last.
- Delay: The start of the fade will be delayed by this amount of time.
Key Tracking
This device alters its output value by responding to the key values of notes. The full output value range of 0 to 1 is scaled to fit within the min/max range.
- Min: Minimum key value.
- Min: Maximum key value.
LFO
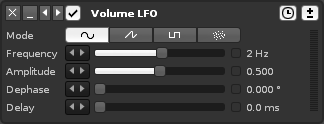
The Low Frequency Oscillator generates a signal that cycles through a relatively slow pattern. The signal is constructed by applying the various parameters to a repeating waveform, which can be chosen from four simple shapes.
- Frequency: The speed of the oscillation.
- Amplitude: The maximum range that the value will oscillate to.
- Dephase: Changes which part of the oscillation cycle that the output will start at.
- Delay: The amount of time at the start of the modulation that the LFO cycle will be delayed by.
Operand
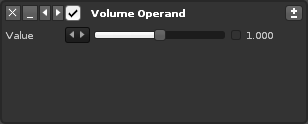
A simple value output device. The "Input" slider at the beginning of the chain is also an Operand device.
- Value: The value which will be output.
Stepper
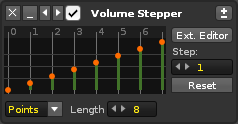
This device features an envelope that can be customised by placing points onto individual 'steps'. Every time a note is played the cursor moves within the envelope, changing the output value. You may find it useful to watch our video on this subject.
The cursor can either move forward by a set number of steps or select a step at random. When moving forwards, the stepping 'wraps around' once the end of the envelope is reached. If the Length and the Step values are not divisible as whole numbers then the wrap-around will begin at a step other than 0, and the sequence will be different each time.
The main graphical section of this device displays the envelope and the points used to create it. Left-clicking on a point will select it and click-dragging will move it around. Holding down 'Left Ctrl' will display the current value of a point and also lock it in place horizontally, allowing you to fine-tune its value vertically. Double-clicking on an empty step will create a new point, while double-clicking on an existing point will remove it. For more advanced editing options, see the Using The External Editor section.
The following options are directly under the envelope graphic:
- Envelope Type: Dictates how the envelope's value will change over time.
- Points: Only changes value when a point is encountered.
- Lines: Initially interpolates in a straight line, but the handles between points can be used to create curves and control their easing.
- Curves: Interpolates with a smooth cubic curve, easing into and out of points.
- Length: Number of steps that make up the envelope (1 - 256).
These are the options found on the right side of the device:
- Ext. Editor: This will open the envelope graphic in the large central section of the Modulation interface, allowing for finer control over details and access to additional tools. For more details, see the Using The External Editor section.
- Step: The number of steps forward that the cursor takes every time a note played (0 - 16). Reducing the value below 0 enters Random mode, where new notes will select a step at random.
- Reset: Returns the cursor to step zero (the start of the envelope). Automating this with a macro allows the cursor to be moved to a specific step.
Velocity Tracking
This device alters its output value by responding to the velocity values of notes.
- Mode
- Clamp: Note values played outside of the min/max range will be clamped at the min/max values.
- Scale: The entire velocity range is scaled to fit within this device's min/max range.
- Min: The minimum output value.
- Max: The maximum output value.
Using The External Editor
Pressing the "Ext. Editor" button will open the envelope graphic in the large central section of the Modulation interface, allowing for finer control over details and access to additional tools. Using the mouse-wheel on the envelope will zoom in/out. Clicking either the top right "X" or "Ext. Editor" button will remove the larger editor.
Left-clicking on a point will select it and click-dragging will move it around. Holding "Left Shift" while moving a point will remove all other points that it touches. Using "Left Ctrl" will display the current value of a point and also lock it in place horizontally, allowing you to fine-tune its value vertically. Double-clicking in the envelope will create a new point, while double-clicking on an existing point will remove it. Left-click-dragging across the envelope will create a highlighted area and select any points contained within, allowing them to be adjusted all at once.
Processing Controls And Options
- Draw: Draw mode allows you to draw points on the envelope with the mouse.
- Time: The selected point's location in time.
- Snap to Grid: Will snap the horizontal creation and movement of points to the current resolution of the grid.
- Scaling: (Only available in Lines mode) Controls the easing of the curve between the selected point and next one.
- Value: The value of the selected point. Left-click to enter a new value.
- Snap to Value: Will vertically snap points to values of 1/divisor (the divisor is set in the value box).
- Envelope Type: Dictates how the envelope's value will change over time.
- Points: Only changes value when a point is encountered.
- Lines: Initially interpolates in a straight line, but the handles between points can be used to create curves and control their easing.
- Curves: Interpolates with a smooth cubic curve, easing into and out of points.
- Length: Length of the envelope.
 - Move the envelope or selected points to the left/right. Will wrap around the edges.
 - Flip the envelope or selected points horizontally/vertically.
 - Humanizes the envelope or selected area by randomly adding or subtracting a small amount to the point values.
 - Opens the envelope editor in a completely separate window, which can be moved around and resized. There is also an additional maximize button at the window's top right corner. Clicking
  "Attach" will reattach the window to the main interface.
Right-click Context Menu
- Cut: Cut the points contained within the selection area.
- Copy: Copy the points contained within the selection area.
- Paste: Paste the previously copied points into the envelope from the cursor position (left-clicking in the envelope will set the cursor position for pasting operations).
- Paste Continuously: Paste the previously copied points into the envelope from the cursor position and repeat until the end of the envelope.
- Insert Paste: Paste the previously copied points into the envelope from the cursor position and move the rest of the envelope to the right. Note that this will not affect the length of the envelope and so any points shifted outside of it will be lost.
- Cut Selected Time: Cut the selected area.
- Delete Envelope: Delete the whole envelope.
- Process: Applies to the entire envelope or the selected area if there is one.
- Create Random Points: Create points of random value.
- Create Exponential Curve: Create an exponential curve rising from 0 to 1. Use the flip buttons to achieve other curves.
- Create Linear Curve: Create a linear curve rising from 0 to 1.
- Create Sine Curve: Create a single cycle sine curve.
