Sampler: Difference between revisions
imported>Achenar No edit summary |
imported>Achenar No edit summary |
||
| Line 4: | Line 4: | ||
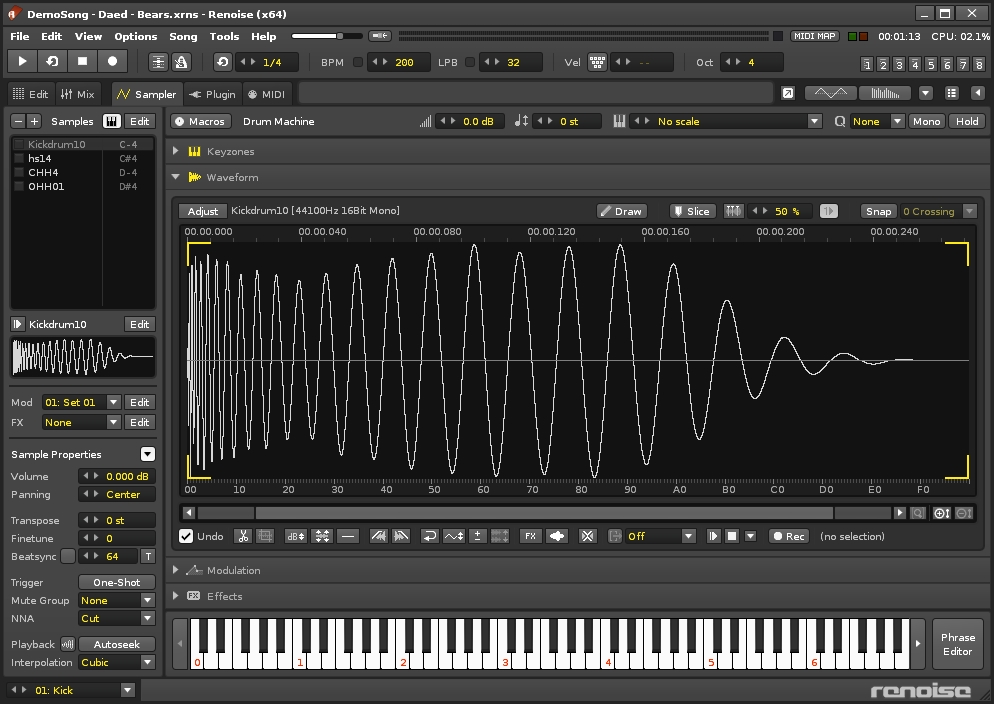
Renoise has a strong focus on samples as instruments and at the heart of this is a powerful built-in Sampler to aid you in creating and sculpting brand new sounds. An instrument may contain any number of samples and these are always listed in the [[#Sample List|Sample List]] section on the left. The main central section of the Sampler is split into five different parts, each devoted to a different aspect of sample-based instrument construction. | Renoise has a strong focus on samples as instruments and at the heart of this is a powerful built-in Sampler to aid you in creating and sculpting brand new sounds. An instrument may contain any number of samples and these are always listed in the [[#Sample List|Sample List]] section on the left. The main central section of the Sampler is split into five different parts, each devoted to a different aspect of sample-based instrument construction. | ||
Keyzones allow different samples to be triggered over a variety of notes and velocity ranges. The Waveform editor displays the samples so you can edit them with provided tools and see the results graphically. Adding Modulation and Effects to samples expands the possibilities of their sound beyond the original audio. Finally, with the Phrase Editor you can use an instrument's samples to compose any number of musical phrases that will be played on specific notes. | [[Keyzones]] allow different samples to be triggered over a variety of notes and velocity ranges. The [[Waveform|Waveform editor]] displays the samples so you can edit them with provided tools and see the results graphically. Adding [[Modulation]] and [[Effects]] to samples expands the possibilities of their sound beyond the original audio. Finally, with the [[Phrase Editor]] you can use an instrument's samples to compose any number of musical phrases that will be played on specific notes. | ||
New sounds can be recorded directly into the Sampler from external sources, or created by hand with the simple Draw tool. Any changes made to samples using the Sample Editor are exclusive to the samples within that particular Renoise song. The source samples are never modified unless you explicitly save and overwrite the file by saving it in the [[Disk Browser]]. Besides being non-destructive to the sample files the Sampler also supports endless undo/redo-ing of all your actions. | New sounds can be recorded directly into the Sampler from external sources, or created by hand with the simple Draw tool. Any changes made to samples using the Sample Editor are exclusive to the samples within that particular Renoise song. The source samples are never modified unless you explicitly save and overwrite the file by saving it in the [[Disk Browser]]. Besides being non-destructive to the sample files the Sampler also supports endless undo/redo-ing of all your actions. | ||
| Line 14: | Line 14: | ||
== Sample List == | == Sample List == | ||
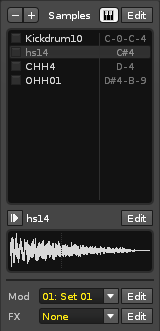
Located at the left, this section provides a list of the instrument's samples and is always accessible no matter what central section you're working with, so you can switch between different samples whenever you wish. To select a sample, left-click on it in the list. This will also show the name and | Located at the left, this section provides a list of the instrument's samples and is always accessible no matter what central section you're working with, so you can switch between different samples whenever you wish. To select a sample, left-click on it in the list. This will also show the name, waveform and assigned Modulation/FX sets of the sample at the bottom. | ||
[[image:3.0_sampler-samplelist.png]] | [[image:3.0_sampler-samplelist.png]] | ||
| Line 26: | Line 26: | ||
* [[Image:3.0_sampler-autoselect.png|middle]] - When enabled will automatically select a sample from the list when it is played on the keyboard or by a MIDI device. | * [[Image:3.0_sampler-autoselect.png|middle]] - When enabled will automatically select a sample from the list when it is played on the keyboard or by a MIDI device. | ||
* [[Image:3.0_sampler-edit.png|middle]] - Opens the Keyzones editor. Note that the Keyzone range of each sample in the list is displayed to the right of it. | * [[Image:3.0_sampler-edit.png|middle]] - Opens the [[Keyzones|Keyzones editor]]. Note that the Keyzone range of each sample in the list is displayed to the right of it. | ||
* [[Image:3.0_sampler-play.png|middle]] - Play the current sample with its preview options (set in the Waveform editor). | * [[Image:3.0_sampler-play.png|middle]] - Play the current sample with its preview options (set in the [[Waveform|Waveform editor]]). | ||
* [[Image:3.0_sampler-edit.png|middle]] - Opens the Waveform editor and displays the currently selected sample. | * [[Image:3.0_sampler-edit.png|middle]] - Opens the [[Waveform|Waveform editor]] and displays the currently selected sample. | ||
* [[Image:3.0_sampler-mod.png|middle]] - Assigns a Modulation set to the current sample. Pressing Edit will open the [[Modulation|Modulation editor]]. | |||
* [[Image:3.0_sampler-fx.png|middle]] - Assigns an FX set to the current sample. Pressing Edit will open the [[Effects|Effects editor]]. | |||
== Sample Properties == | == Sample Properties == | ||
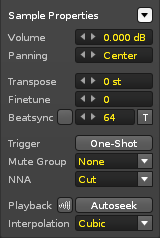
Directly under the Sample List, the properties of the currently selected sample are displayed. The arrow button at the top right toggles the opening and closing of this section. | |||
[[image:3.0_sampler-sampleproperties.png]] | |||
=== Options === | |||
* '''Volume:''' The sample playback volume. | |||
* '''Panning:''' The panning of the sample. | |||
* '''Transpose:''' Transpose note playback in semi-tonal increments. | |||
* '''Finetune:''' Fine-tuning of the value of the Transpose setting. | |||
* '''Beatsync:''' When enabled, the sample will be automatically pitched up or down so that it lasts for a certain amount of pattern lines, adjusted via the value box. As a consequence, the sample is "locked" and you will be unable to use it at other pitches. It will also automatically update its pitch if the song changes BPM. Useful for syncing drumbeat loops. Alternatively, press the ''"T"'' button, which will automatically adjust the Transpose and Finetuning settings to the correct values, leaving you free to change them and play the sample at other pitches. | |||
* '''Trigger:''' | |||
* '''Mute Group:''' | |||
* '''NNA:''' New Note Action. When a note is played in a column while an existing note is still is the process of playing, the NNA value specifies how the previous note should stop (if at all). By default, notes in the same column will "cut off" each other. To achieve polyphony, you normally just use multiple columns. But by setting the NNA to ''"Continue"'' or ''"[[Playing_Notes_with_the_Computer_Keyboard#Note_Off|Note OFF]]"'', you can create a sustained playback with multiple notes using just one column. | |||
* '''Playback''' | |||
** '''Autofade:''' Automatically inserts a quick fade at the beginning and end of a sample. Useful for preventing unwanted audio clicks. | |||
** '''Autoseek:''' The default behaviour for a sample in Renoise is that it can only be heard during playback from when the note is initially triggered. Enabling Autoseek causes the sample to behave like a traditional audio channel, meaning that the sample can be heard at any point during its playback in a song. Highly recommended for vocals, background ambience and other lengthy recorded audio. | |||
* '''Interpolate:''' The quality at which the sample is re-sampled when generating notes different from the original pitch. ''"Cubic"'' is a very good default interpolation setting which results in the best real-time sound quality. ''"Linear"'' sounds rougher when playing a sample at a lower pitch. By turning the interpolation ''"Off"'', samples will sound a bit more metallic and rough, which can be useful if that's the kind of sound you're after. ''"Off"'' can also sound good when using very short looped samples as wave-table generators. When rendering songs as WAV files, you will have the choice of another interpolation mode: ''"Sinc"''. This method is the best quality re-sampling method, but is very, very slow and so cannot be used for real-time playback. When selecting ''"Sinc"'', only ''"Cubic"'' interpolated samples will be replaced with ''"Sinc"''. Samples with ''"Linear"'' and ''"Off"'' interpolations will use those original modes. | |||
== Track Selector == | |||
Revision as of 11:43, 19 March 2014
Sampler
Renoise has a strong focus on samples as instruments and at the heart of this is a powerful built-in Sampler to aid you in creating and sculpting brand new sounds. An instrument may contain any number of samples and these are always listed in the Sample List section on the left. The main central section of the Sampler is split into five different parts, each devoted to a different aspect of sample-based instrument construction.
Keyzones allow different samples to be triggered over a variety of notes and velocity ranges. The Waveform editor displays the samples so you can edit them with provided tools and see the results graphically. Adding Modulation and Effects to samples expands the possibilities of their sound beyond the original audio. Finally, with the Phrase Editor you can use an instrument's samples to compose any number of musical phrases that will be played on specific notes.
New sounds can be recorded directly into the Sampler from external sources, or created by hand with the simple Draw tool. Any changes made to samples using the Sample Editor are exclusive to the samples within that particular Renoise song. The source samples are never modified unless you explicitly save and overwrite the file by saving it in the Disk Browser. Besides being non-destructive to the sample files the Sampler also supports endless undo/redo-ing of all your actions.
Sample List
Located at the left, this section provides a list of the instrument's samples and is always accessible no matter what central section you're working with, so you can switch between different samples whenever you wish. To select a sample, left-click on it in the list. This will also show the name, waveform and assigned Modulation/FX sets of the sample at the bottom.
Controls
 - When enabled will automatically select a sample from the list when it is played on the keyboard or by a MIDI device.
 - Opens the Keyzones editor. Note that the Keyzone range of each sample in the list is displayed to the right of it.
 - Play the current sample with its preview options (set in the Waveform editor).
 - Opens the Waveform editor and displays the currently selected sample.
 - Assigns a Modulation set to the current sample. Pressing Edit will open the Modulation editor.
 - Assigns an FX set to the current sample. Pressing Edit will open the Effects editor.
Sample Properties
Directly under the Sample List, the properties of the currently selected sample are displayed. The arrow button at the top right toggles the opening and closing of this section.
Options
- Volume: The sample playback volume.
- Panning: The panning of the sample.
- Transpose: Transpose note playback in semi-tonal increments.
- Finetune: Fine-tuning of the value of the Transpose setting.
- Beatsync: When enabled, the sample will be automatically pitched up or down so that it lasts for a certain amount of pattern lines, adjusted via the value box. As a consequence, the sample is "locked" and you will be unable to use it at other pitches. It will also automatically update its pitch if the song changes BPM. Useful for syncing drumbeat loops. Alternatively, press the "T" button, which will automatically adjust the Transpose and Finetuning settings to the correct values, leaving you free to change them and play the sample at other pitches.
- Trigger:
- Mute Group:
- NNA: New Note Action. When a note is played in a column while an existing note is still is the process of playing, the NNA value specifies how the previous note should stop (if at all). By default, notes in the same column will "cut off" each other. To achieve polyphony, you normally just use multiple columns. But by setting the NNA to "Continue" or "Note OFF", you can create a sustained playback with multiple notes using just one column.
- Playback
- Autofade: Automatically inserts a quick fade at the beginning and end of a sample. Useful for preventing unwanted audio clicks.
- Autoseek: The default behaviour for a sample in Renoise is that it can only be heard during playback from when the note is initially triggered. Enabling Autoseek causes the sample to behave like a traditional audio channel, meaning that the sample can be heard at any point during its playback in a song. Highly recommended for vocals, background ambience and other lengthy recorded audio.
- Interpolate: The quality at which the sample is re-sampled when generating notes different from the original pitch. "Cubic" is a very good default interpolation setting which results in the best real-time sound quality. "Linear" sounds rougher when playing a sample at a lower pitch. By turning the interpolation "Off", samples will sound a bit more metallic and rough, which can be useful if that's the kind of sound you're after. "Off" can also sound good when using very short looped samples as wave-table generators. When rendering songs as WAV files, you will have the choice of another interpolation mode: "Sinc". This method is the best quality re-sampling method, but is very, very slow and so cannot be used for real-time playback. When selecting "Sinc", only "Cubic" interpolated samples will be replaced with "Sinc". Samples with "Linear" and "Off" interpolations will use those original modes.


