Mixer: Difference between revisions
imported>Taktik |
mNo edit summary |
||
| (38 intermediate revisions by 4 users not shown) | |||
| Line 1: | Line 1: | ||
= Mixer = | = Mixer = | ||
[[Image:3.2_tab-mix.png]] | |||
The Mixer | The Mixer is opened with the Mix tab at the top left of the interface. | ||
If you are familiar with hardware mixer consoles, the Mixer in Renoise will look familiar to you. It provides a quick overview of all available tracks, [[Effect Chains|Track Effects]] and output levels. This is especially useful in the last production stage, when you are finished with the main song structure and need to concentrate on polishing the final mix. The Mixer also allows you to display a subset of track effect parameters which you can customise. Using this, you can prepare your songs for live performance by showing only the parameters you would like to concentrate on adjusting. | |||
[[Image:3.0_mixer.png]] | |||
== Detaching The Mixer == | |||
Near the top-right of the interface and to the left of the [[Track Scopes|Scopes]] options is the [[Image:3.0_modulation-detach.png|text-bottom]] Detach button, which opens the Mixer in a completely separate window that can be moved around and resized. There are also additional buttons at the window's top right corner for minimizing, maximizing and closing. Clicking [[Image:3.0_modulation-attach.png|text-bottom]] Attach will reattach the window to the main interface. | |||
Note that the [[Track Scopes#Spectrum|Spectrum]] and [[Effect Chains|Track Effects]] panels and buttons are moved to the Mixer window when it’s detached. | |||
== | == Pre/Post Volume and Panning Concept == | ||
Volume and panning controls in the Mixer can be set up to show two different levels: | |||
[[image:3.0_mixer-prepost.png]] | |||
Track | * '''Pre:''' Volume and panning levels which are applied after instrument playback, but before [[Effect Chains|Track Effects]] are applied. | ||
* '''Post:''' Volume and panning levels which are applied after all [[Effect Chains|Track Effects]] are applied. This is the final sound leaving the track and being fed into the Master Track. | |||
The idea behind the Pre/Post mix separation is that you should use the Pre levels while composing the song. Automation, like the fade-in of tracks, should be applied here or with a Gainer Device. Post volume and panning levels cannot be automated and should only be used in the final mixing stage to balance the mix. | |||
== Customizing the Mixer Layout == | |||
At the right side of the Mixer you will notice a set of buttons that allow you to show/hide to some of the components: | |||
* [[Image:3.0_mixer-parameters.png|text-bottom]] - Parameter labels above effect sliders. | |||
* [[Image:3.0_mixer-mute.png|text-bottom]] - Mute and solo track controls. | |||
* [[Image:3.0_mixer-pan.png|text-bottom]] - Panning sliders. | |||
* [[Image:3.0_mixer-meters.png|text-bottom]] - VU meters and main volume faders. | |||
* [[Image:3.0_mixer-vol.png|text-bottom]] - Volume edit box. | |||
* [[Image:3.0_mixer-delay.png|text-bottom]] - Custom track delays. Entering a negative value will play the track before others, while a positive value will play it after. This is only available for [[Pattern_Editor#Tracks|regular Tracks]]. This can be useful to compensate small latency problems with MIDI and plugin based tracks. | |||
* [[Image:3.0_mixer-routing.png|text-bottom]] - Audio routing control. Audio routing defines where the track's final output will be sent to. Selecting ''"Master"'' will send the output to the Master Track and through its effect chain. Selecting a dedicated output of your soundcard will bypass the Master Track, allowing you to separate and mix Renoise tracks with an external mixer console. This is only possible if your soundcard allows the use of multiple channels. To make use of this feature on Windows, you have to use ASIO; on Linux, Jack Audio. | |||
Track colours can be shown or hidden in the Mixer as well. Right-click anywhere in the Mixer effect chain section and select, ''"Show Track Colors"''. | |||
== Working with Effects and Chains == | |||
[[ | [[Effect Chains|Track Effects]] devices are shown in the Mixer rack above the track levels. Right-clicking an effect brings up a set of options for both that specific effect and the whole chain. To show/hide particular effect parameters, right-click on the effect and choose them from the ''"Show Sliders"'' menu option. | ||
[[Image:3.0_mixer-contextmenu.png]] | |||
== Send Devices/Tracks and the Post Mixer == | |||
(Send Device | To route a track into a [[Pattern_Editor#Send_Tracks|Send Track]], a #Send device is inserted into the original track. For a full explanation of how this works, see [[Routing_Devices#.23Send|#Send device]] in the Routing Devices section of the manual. In the Mixer, the #Send device's slider controls the amount of audio that is sent to the send track. | ||
When #Send devices use the ''"Mute Source"'' option, the post volume and panning levels will have no effect. That's because the signal is muted before it reaches post-mixer device. To change the track's levels in this case, you either have to have to adjust the #Send device's sliders or use the receiving Send Track's volume and panning levels. | |||
To visualize this in the mixer, track levels which do not reach the Post volume and panning are shown by a different colour (white by default instead of green, but this may vary depending on the [[Preferences#Theme|current interface Theme]]): | |||
[[Image:3.0_mixer-send.png]] | |||
(Track with a Send Device using Mute Source) | |||
[[Image:3.0_mixer-sendrouting.png]] | |||
(Send Device Routing in the Mixer) | |||
== Adjusting Level Meters == | |||
To disable or change the scaling for all meters, right-click on any level meter in the mixer and choose from the list. This also works for the master level meter at the top of the Renoise interface. | |||
[[Image:3.0_mixer-meterscale.png]] | |||
== Controlling the Mixer with a MIDI Controller == | |||
You can attach MIDI controllers to the Pre/Post volume and mute/solo controls, allowing you to comfortably mix a song using the controller. To do so, select ''"View -> Midi Mapping…"'' from the main menu or click on the ''"MIDI Map"'' button at the top of the Renoise interface, next to the main VU meter. | |||
Have a look at the [[MIDI Mapping]] section of the manual for a more detailed description of the available features. | |||
== Drag and Drop, Copy and Paste == | == Drag and Drop, Copy and Paste == | ||
To copy | To copy an effect from one track to the another, simply click and drag it to a new place. Holding ''"Left Control"'' while dropping the effect will create a copy of the device. The standard cut/copy/paste commands also work in the Mixer (''"Left Control + X"'', ''"Left Control + C"'', ''"Left Control + V"''). | ||
Note: Copying or moving an effect from one track to another will not move device's Automation(s) as well. When moving a device, the original Automation(s) will be removed. | |||
[[Image: | <!-- RENOISE_NO_PDF_START --> | ||
[[Image:3.0_mixer-devicechain.gif]] | |||
<!-- RENOISE_NO_PDF_STOP --> | |||
Latest revision as of 19:35, 4 July 2023
Mixer
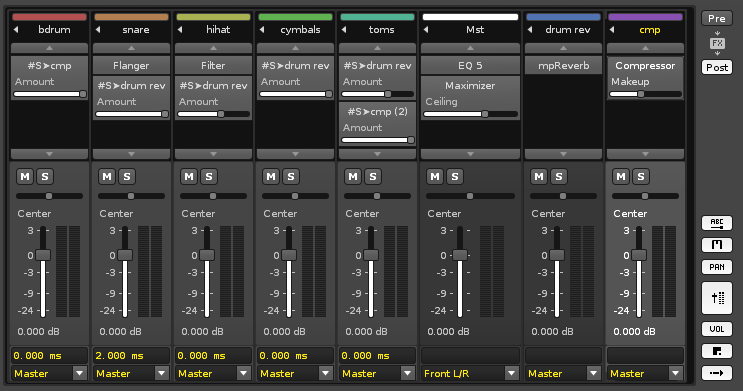
The Mixer is opened with the Mix tab at the top left of the interface.
If you are familiar with hardware mixer consoles, the Mixer in Renoise will look familiar to you. It provides a quick overview of all available tracks, Track Effects and output levels. This is especially useful in the last production stage, when you are finished with the main song structure and need to concentrate on polishing the final mix. The Mixer also allows you to display a subset of track effect parameters which you can customise. Using this, you can prepare your songs for live performance by showing only the parameters you would like to concentrate on adjusting.
Detaching The Mixer
Near the top-right of the interface and to the left of the Scopes options is the ![]() Detach button, which opens the Mixer in a completely separate window that can be moved around and resized. There are also additional buttons at the window's top right corner for minimizing, maximizing and closing. Clicking
Detach button, which opens the Mixer in a completely separate window that can be moved around and resized. There are also additional buttons at the window's top right corner for minimizing, maximizing and closing. Clicking ![]() Attach will reattach the window to the main interface.
Attach will reattach the window to the main interface.
Note that the Spectrum and Track Effects panels and buttons are moved to the Mixer window when it’s detached.
Pre/Post Volume and Panning Concept
Volume and panning controls in the Mixer can be set up to show two different levels:
- Pre: Volume and panning levels which are applied after instrument playback, but before Track Effects are applied.
- Post: Volume and panning levels which are applied after all Track Effects are applied. This is the final sound leaving the track and being fed into the Master Track.
The idea behind the Pre/Post mix separation is that you should use the Pre levels while composing the song. Automation, like the fade-in of tracks, should be applied here or with a Gainer Device. Post volume and panning levels cannot be automated and should only be used in the final mixing stage to balance the mix.
Customizing the Mixer Layout
At the right side of the Mixer you will notice a set of buttons that allow you to show/hide to some of the components:
 - Parameter labels above effect sliders.
 - Mute and solo track controls.
 - Panning sliders.
 - VU meters and main volume faders.
 - Volume edit box.
 - Custom track delays. Entering a negative value will play the track before others, while a positive value will play it after. This is only available for regular Tracks. This can be useful to compensate small latency problems with MIDI and plugin based tracks.
 - Audio routing control. Audio routing defines where the track's final output will be sent to. Selecting "Master" will send the output to the Master Track and through its effect chain. Selecting a dedicated output of your soundcard will bypass the Master Track, allowing you to separate and mix Renoise tracks with an external mixer console. This is only possible if your soundcard allows the use of multiple channels. To make use of this feature on Windows, you have to use ASIO; on Linux, Jack Audio.
Track colours can be shown or hidden in the Mixer as well. Right-click anywhere in the Mixer effect chain section and select, "Show Track Colors".
Working with Effects and Chains
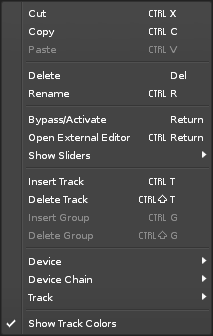
Track Effects devices are shown in the Mixer rack above the track levels. Right-clicking an effect brings up a set of options for both that specific effect and the whole chain. To show/hide particular effect parameters, right-click on the effect and choose them from the "Show Sliders" menu option.
Send Devices/Tracks and the Post Mixer
To route a track into a Send Track, a #Send device is inserted into the original track. For a full explanation of how this works, see #Send device in the Routing Devices section of the manual. In the Mixer, the #Send device's slider controls the amount of audio that is sent to the send track.
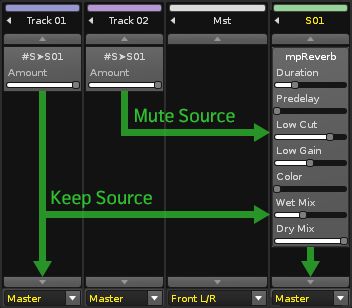
When #Send devices use the "Mute Source" option, the post volume and panning levels will have no effect. That's because the signal is muted before it reaches post-mixer device. To change the track's levels in this case, you either have to have to adjust the #Send device's sliders or use the receiving Send Track's volume and panning levels.
To visualize this in the mixer, track levels which do not reach the Post volume and panning are shown by a different colour (white by default instead of green, but this may vary depending on the current interface Theme):
(Track with a Send Device using Mute Source)
(Send Device Routing in the Mixer)
Adjusting Level Meters
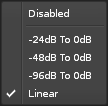
To disable or change the scaling for all meters, right-click on any level meter in the mixer and choose from the list. This also works for the master level meter at the top of the Renoise interface.
Controlling the Mixer with a MIDI Controller
You can attach MIDI controllers to the Pre/Post volume and mute/solo controls, allowing you to comfortably mix a song using the controller. To do so, select "View -> Midi Mapping…" from the main menu or click on the "MIDI Map" button at the top of the Renoise interface, next to the main VU meter.
Have a look at the MIDI Mapping section of the manual for a more detailed description of the available features.
Drag and Drop, Copy and Paste
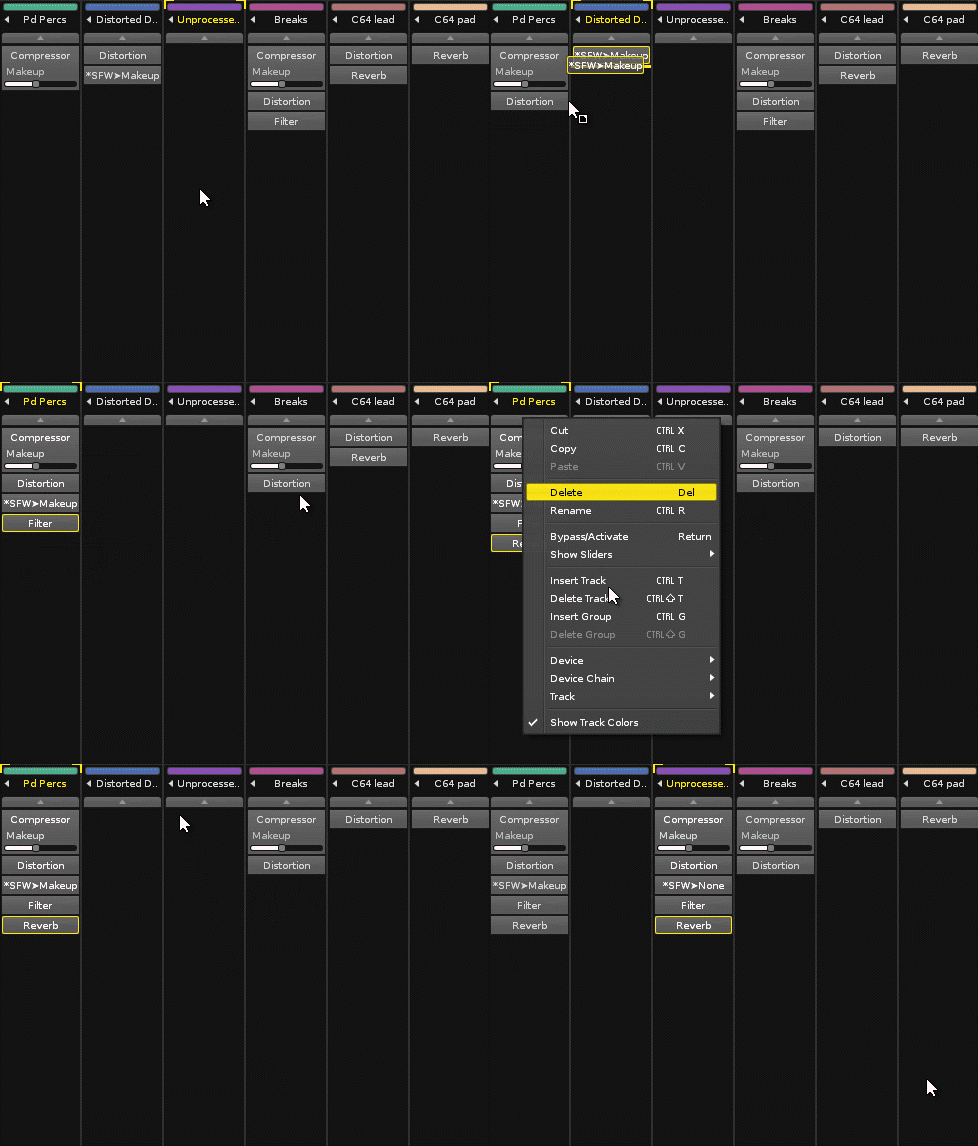
To copy an effect from one track to the another, simply click and drag it to a new place. Holding "Left Control" while dropping the effect will create a copy of the device. The standard cut/copy/paste commands also work in the Mixer ("Left Control + X", "Left Control + C", "Left Control + V").
Note: Copying or moving an effect from one track to another will not move device's Automation(s) as well. When moving a device, the original Automation(s) will be removed.
