Pattern Editor: Difference between revisions
imported>Achenar No edit summary |
imported>Achenar No edit summary |
||
| Line 51: | Line 51: | ||
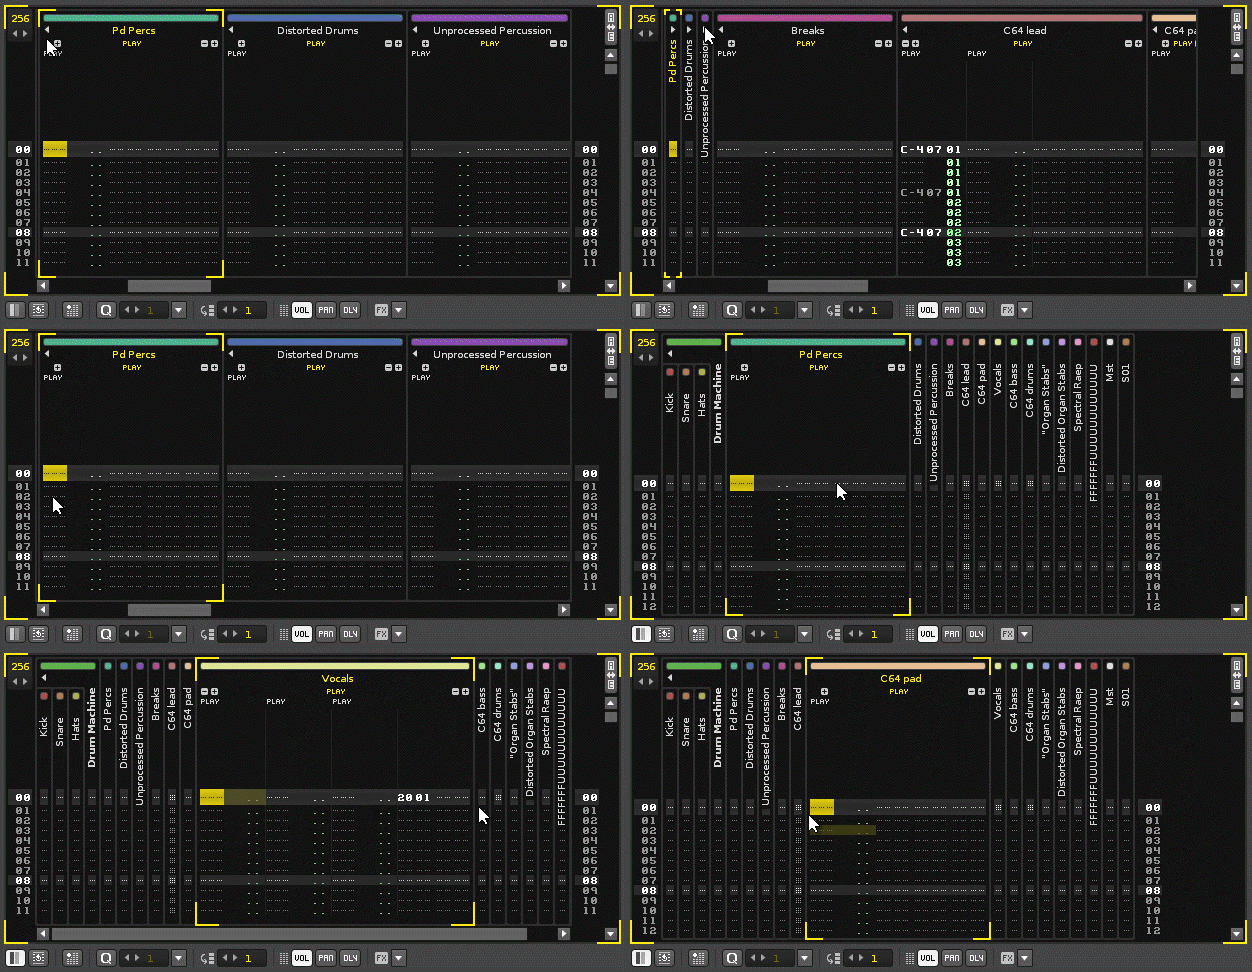
To reposition a track, click on its name, hold the button down and drag the track to either side. This can be done in both the Pattern Editor and the [[Mixer]]. You can also move tracks by using the ''Ctrl/Command + Alt + Left/Right'' shortcuts. | To reposition a track, click on its name, hold the button down and drag the track to either side. This can be done in both the Pattern Editor and the [[Mixer]]. You can also move tracks by using the ''Ctrl/Command + Alt + Left/Right'' shortcuts. | ||
[[image: | [[image:3.0_patterneditor-orderingtracks.gif]] | ||
To duplicate tracks, you can use the ''"Edit->Duplicate Track" (Left Control/Command + D)'' command from the menu in the Upper Status Bar. | To duplicate tracks, you can use the ''"Edit->Duplicate Track" (Left Control/Command + D)'' command from the menu in the Upper Status Bar. | ||
| Line 61: | Line 61: | ||
Using [[#Pattern Editor Control Panel|Single Track Edit Mode]] will cause all of the tracks and groups to collapse, except the one that cursor is currently in. Moving the cursor to other tracks while in this mode will automatically expand those tracks and collapse the one you were previously in. | Using [[#Pattern Editor Control Panel|Single Track Edit Mode]] will cause all of the tracks and groups to collapse, except the one that cursor is currently in. Moving the cursor to other tracks while in this mode will automatically expand those tracks and collapse the one you were previously in. | ||
[[Image: | [[Image:3.0_patterneditor-collapsingtracks.gif]] | ||
=== Changing Track Colors === | === Changing Track Colors === | ||
Revision as of 16:43, 18 April 2014
Pattern Editor
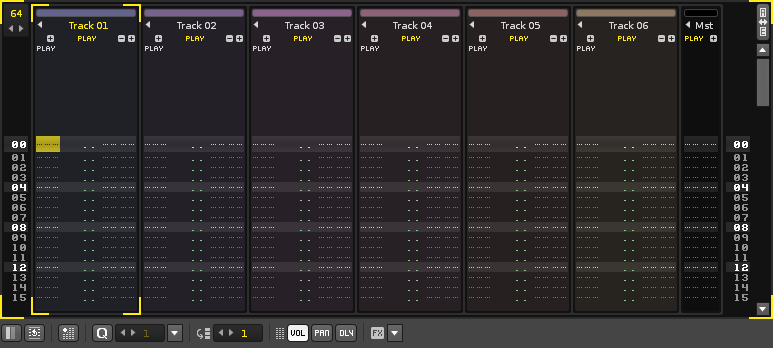
The Pattern Editor is the main editor used to create music in Renoise. Instruments are recorded by entering notes onto lines in the order that they are to be played, from top to bottom. A pattern can contain multiple tracks, typically one for each different instrument and each with their own separate set of effects. Songs are created by arranging a sequence of patterns with the Pattern Sequencer and the Pattern Matrix.
Patterns
A pattern is simply a block of time containing the notes played by different instruments in different tracks. The easiest way to understand this is to load in a demo song by double-clicking on it in the Disk Browser and observing what happens after you press Play with the "Spacebar".
As the horizontal bar moves down the pattern, it plays the notes that it encounters on the way. When the end of a pattern is reached, the song moves on to the next pattern in the sequence, as controlled by the Pattern Sequencer. So, a pattern is usually used to represent a specific section of a song that may be repeated again in future. The length and speed of a pattern can be changed, so the exact nature of a specific pattern can vary wildly depending on the whims of the composer.
Tracks
There are four different types of track in Renoise:
Sequencer Tracks
These standard tracks are where you record notes onto the lines of a Note Column. Each track also features Effect Columns, which are used to apply effect commands to instruments and to control Track Effects.
Group Tracks
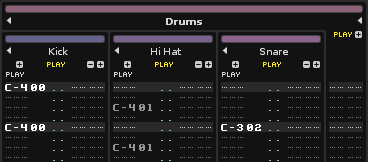
Used to logically group together similar Sequencer Tracks, such as all percussion, all lead synths etc. The child tracks have their output automatically routed through the parent track, though you can change this with the Pre Mixer. This means that Track Effects, Automation and Pattern Effect Commands used in the Group Track will affect the audio coming from the Sequencer Tracks contained within it.
Send Tracks
Send Tracks are fed audio from other tracks using Send Devices and are typically used to apply the same set of Track Effects to multiple tracks at once. Notes cannot be entered into Send Tracks and so they only feature Effect Columns, which are used to control the Track Effects and Pattern Effect Commands.
Master Track
The Master Track is where all audio produced by the other tracks finally ends up. Effects placed on the Master Track will therefore affect the output of the entire song. Notes cannot be entered into the Master Track and so it only features Effect Columns, which are used to control the Track Effects and Pattern Effect Commands.
Organising Tracks
Any track can be renamed by double-clicking on its name and typing in a new one.
To add or remove tracks, you can use the "Edit->Insert Track" (Left Control/Command + T) and "Edit->Delete Track" (Left Control/Command + Left Shift + T) commands from the menu in the Upper Status Bar. If the currently selected track is a Sequencer Track, then a new Sequencer Track will be added to the right of it. If the currently selected track is a Send Track or the Master Track, then another Send Track will be added.
To add a group track, use the "Edit->Insert Group" (Left Control/Command + G) command or drag a track onto another one while holding down Alt. This will create a new group and add both tracks to it.
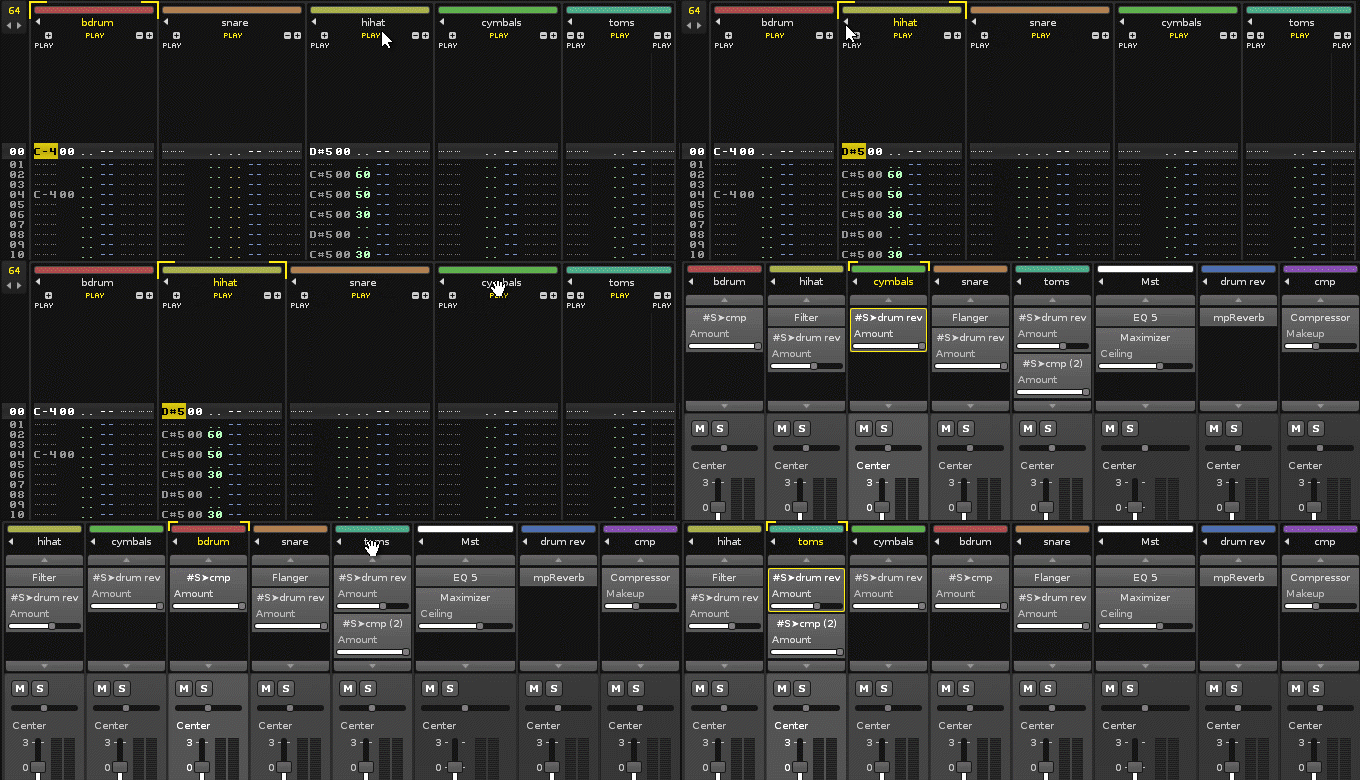
To reposition a track, click on its name, hold the button down and drag the track to either side. This can be done in both the Pattern Editor and the Mixer. You can also move tracks by using the Ctrl/Command + Alt + Left/Right shortcuts.
To duplicate tracks, you can use the "Edit->Duplicate Track" (Left Control/Command + D) command from the menu in the Upper Status Bar.
Collapsing Tracks
To collapse a track, press the small arrow to the left of the track's name. This just hides most of its information; the track will still play as normal. You can collapse groups of tracks in the same way and using the arrow to the right of a group's name, you can also collapse its Effect Column.
Using Single Track Edit Mode will cause all of the tracks and groups to collapse, except the one that cursor is currently in. Moving the cursor to other tracks while in this mode will automatically expand those tracks and collapse the one you were previously in.
Changing Track Colors
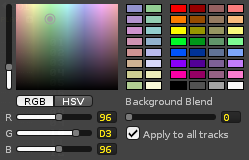
To change the color of a track, left-click on the color slot above the track name. Using the color picker you can move around the grid to choose a color, while the left-hand slider controls the saturation. You can also pick colors from the available swatches or right click on a swatch to save your current color to it. The "Background Blend" slider controls the amount of color present in the track's background. Enabling "Apply to all tracks" will apply the slider value to all of the tracks at once.
Columns
There are two types of columns in tracks:
- Note columns, used to record instruments by entering notes.
- Effect columns, used to apply Pattern Effect Commands and control Track Effects.
Adding / Removing Columns
To add/remove Note or Effect columns, you can use the small +/- icons next to the track names. Alternatively, you can use the shortcut, "Left Control/Command + Left Shift + left/right arrow key" to either add/remove a Note or Effect column, depending on where the cursor is (place it where you would like that column type to be duplicated).
Each Sequencer Track can have up to 12 Note Columns and 8 Effect Columns.
Groups Tracks, Send Tracks and the Master Track can have up to 8 Effect Columns, but cannot have any Note Columns.
Please Note: All numbers in the effect columns and note sub-columns are notated in hexadecimal (counting from 0 to 16, where decimal is 0 to 10). If you are unfamiliar with hexadecimal, then you can read an explanation of it here.
Sub-Note Columns
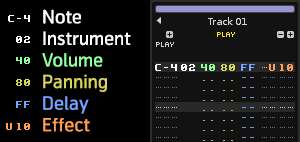
Note columns also have three extra sub-columns each, which are used to control the following parameters on a per-line basis: volume, panning and delay.
- Note: e.g. C-4, A#3. The first two characters represent the musical note, while the third character is the octave number. The notes are not entered letter by letter like a text editor, but like a piano, using the computer keyboard or a MIDI master keyboard.
- Instrument Number: The instrument that will play the note. This is automatically entered when the note is recorded, but it can be changed by hand.
- Volume: (00-80) - The note velocity/volume. Additional effects can also be triggered from here; see the Pattern Effect Commands section of the manual for more details.
- Panning: (00-80) - The panning of the note. This can only be applied to sample-based instruments in Renoise (MIDI and VST plugins will be unaffected by values in this sub-column). Additional effects can also be triggered from here; see Pattern Effect Commands.
- Delay: (00-FF) - A time delay added to the note.
By default, the panning and delay columns are not visible. To show/hide them you can use the keyboard shortcuts, "Left Control/Command + Left Shift + V (Volume), P (Panning), D (Delay)", or you can press the corresponding buttons in the Pattern Editor's Control Panel, located at the bottom of the editor.
Sub-Effect Columns
Effect columns are set up in the format: xxyy.
- Effect Number: The first two digits (xx) define the effect that should be triggered (like a cutoff parameter in a filter, or a sample effect like pitch glide). See the Pattern Effect Commands section of the manual for a full list of the available effects.
- Effect Value: The next two digits (yy) define the effect's value. For example, to a cutoff parameter this would change the frequency, for a pitch glide this would change the rate of the glide.
Lines
Each individual pattern can have a different length, from 1 to 512 lines, which can be changed by altering the value in the box at the top left of the Pattern Editor: ![]()
Lines, Beats and Pattern Resolution
In the Transport Panel there is a "Lines/Beat" option, which changes the number of lines in the Pattern Editor that make up a musical beat. The higher the LPB, the greater the resolution available to you for editing notes, effects and automation. This can be also be adjusted as the song is playing via the Pattern Effect ZLxx, where xx is the new LPB value in hexadecimal.
By default the LPB is 4, meaning that placing a note on every highlighted line will create a simple 4/4 beat in a pattern that is 16 lines long. How many lines you use for a beat is totally up to you, but it can be important to get it correct if you're using Renoise to interact with other beat-based instruments or sequencers, (e.g. plugins which use beat timings) or when syncing a Renoise song with other applications via ReWire.
When working with time signatures other than 4/4, it's useful to set your number of lines in a pattern to a factor of the time signature's numerator multiplied by the LPB. For example, when working in 3/4 and a LBP of 4, you could use a pattern length of 12, 24 or 48; when working in 5/4 you could use a pattern length of 20 or 40 etc. This will allow you to place your notes on exact pattern lines without having to delay notes with the delay column.
You can turn off the LPB highlighting via the Song Settings tab.
Pattern Editor Control Panel
At the bottom of the Pattern Editor is the control panel:
- Single Track Edit Mode: When enabled, only the currently selected track will be shown in the Pattern Matrix.
- Pattern Wrap Mode: Decides what will happen upon reaching the end of a pattern when entering notes step-by-step in Edit Mode. When enabled, the cursor will move to the top of the next pattern in the sequence. When disabled, the cursor will move back to the top of the current pattern.
- Pattern Automation Recording Mode: When enabled, right-clicked and MIDI mapped parameters are recorded into Automation instead of the pattern's Effects Column.
- Chord Mode: Toggles the recording of a single note at a time, or chords (i.e. multiple notes simultaneously) when recording "live".
- Quantize Controls: Toggles live quantization. The value box to the right specifies the quantization value in lines. Use the drop down menu next to the value box to manually quantize a selected area of the current pattern after recording.
- Edit Step: Sets how many lines the cursor should skip down in the Pattern Editor when entering a note or effect.
- Vol/Pan/Dly: Toggles the volume, panning and delay sub-columns.
- FX: Quickly show and add pattern effect commands.
Before anything can be recorded into the Pattern Editor, Edit Mode needs to be enabled, which is done by either pressing the "ESC" key or the record button in the Transport Panel.
Basic Shortcuts
Moving the cursor around in the Pattern Editor can done with the arrow keys. The Page Up/Down buttons will move the cursor up and down 16 lines at a time. To quickly jump to the next note column press "TAB", while "Left Shift + TAB" will jump back to the previous note column. "F9", "F10", "F11" and "F12" will move to the beginning, first quarter, half, last quarter of the pattern, respectively. Hit "End" to skip to the last note in a pattern.
To select an area in the Pattern Editor, hold down the "Left Shift" key while moving around with the arrow keys. This can also be done by left-clicking and dragging with the mouse. The selection can also be cut, copied and pasted using the standard keys: "Left Control/Command + X (Cut), C (Copy), V (Paste)".
A selection can also be made by starting with "Left Control/Command + B" and ending with "Left Control/Command + E".
Advancing mode in the effect columns
When entering an effect column value, the cursor automatically advances to the next row in contrary what happens in most spread-sheet applications. If you want your cursor to advance to the right position, simply hold the left shift-modifier key and the cursors advances to the right.
Column/Track/Selection/Pattern Shortcuts
To quickly edit, copy and paste in the Pattern Editor:
- F1 + MODIFIER: Transpose one note down
- F2 + MODIFIER: Transpose one note up
- F3 + MODIFIER: Cut
- F4 + MODIFIER: Copy
- F5 + MODIFIER: Paste
- F6 + MODIFIER: Flip
- F11 + MODIFIER: Transpose one octave down
- F12 + MODIFIER: Transpose one octave up
Where MODIFIER is:
- Left ALT: Selection in the Pattern
- Left CONTROL/COMMAND + SHIFT: Current Column
- Left SHIFT: Current Track
- Left SHIFT + ALT: Current Group
- Left CONTROL/COMMAND: Whole Pattern
Drag & Drop of Selections
To quickly move and copy a selection of notes or effects, you can also use the mouse. First mark an area in the pattern by left-clicking and dragging, then re-click and hold on the selected area with the mouse and drag the selection to a new position. Holding down the "Left Control/Command" key while dropping will copy the selection instead of moving it.
Recording of Notes into Patterns
Instead of editing notes step by step, you can also record "live". This is done by playing the song with Edit Mode enabled and recording the notes using the keyboard. For a more detailed description, have a look at the Recording and Editing Notes section.
Recording of Effects
To quickly record effect parameter changes into a pattern, click and drag any slider in the Track Effects panel with the right mouse button. This can also be done as the song is playing. For more information, see Recording and Editing Pattern Effects .
Applying Effects
Finally, to get a full list and detailed description of the effects available for use in the Effect Columns, take a look at Pattern Effect Commands section of the manual.
